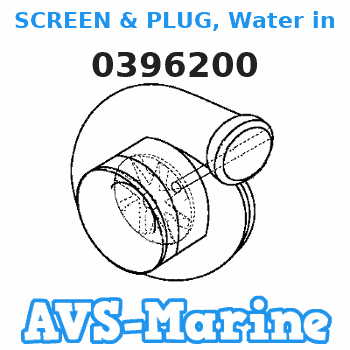
0396200 SCREEN & PLUG, Water intake EVINRUDE
BE4RDHEDS, BE5DREDS, BE5DREUC, BE5FRBECC, BE5FRBEUS, BE6DRECR, BE6DREDS, BE6DREUC, BE8RCB, BE8RCH, BE8RCLT, BE8REDS, E4RDHCCS, E4RDHCDE, E4RDHCEC, E4RDHCUD, E4RDHEIA, E4RDHENM, E4RDHEOD, E4RDHERE, E4RDHESR, E4RDHETB, E5DRECR, E5R4EEM, E5R4EEM, E5R4SI
SCREEN

Price: query
Rating:
You can buy parts:
As an associate, we earn commssions on qualifying purchases through the links below
Compatible models:
BE4RDHEDS
BE5DREDS
BE5DREUC
BE5FRBECC
BE5FRBEUS
BE6DRECR
BE6DREDS
BE6DREUC
BE8RCB
BE8RCH
BE8RCLT
BE8REDS
E4RDHCCS
E4RDHCDE
E4RDHCEC
E4RDHCUD
E4RDHEIA
E4RDHENM
E4RDHEOD
E4RDHERE
E4RDHESR
E4RDHETB
E5DRECR
E5R4EEM
E5R4SIE
E5R4SSB
E6R4EEM
E6R4SIE
E6R4SSB
E6RCCS
E6RCDE
E6RCEC
E6RCOB
E6RCUD
E6REIA
E6RENM
E6REOD
E6RERE
E6RESR
E6RETB
E8DREEA
E8DRSSM
E8RCCS
E8RCDE
E8RCEC
E8RCOB
E8RCUD
E8RECR
E8REIA
E8RENM
E8REOD
E8RERE
E8RESR
E8RETB
E8REUC
E8WREES
E8WRLSIR
E8WRLSSC
HE6FRECA
HE6FREUR
EVINRUDE
BRP EVINRUDE entire parts catalog list:
- GEARCASE » 0396200
BE5DREUC, BE5DRLEUC 1997
BE5FRBECC, BE5FRBLECC, HE5FRECA, HE5FRLECA 1998
BE5FRBEUS, BE5FRBLEUS, HE5FREUR, HE5FRLEUR 1997
BE6DRECR, BE6DRLECR, E6RECR, E6RLECR 1998
BE6DREDS, BE6DRLEDS, BE6REDS, BE6RLEDS, E6REDS, E6RLEDS, E6SLEDS 1996
BE6DREUC, BE6DRLEUC, E6REUC, E6RLEUC 1997
BE8RCB, BE8RCLB 1997
BE8RCH, BE8RCLH 1996
BE8RCLT, BE8RCT 1998
BE8REDS, BE8RLEDS, BE8SRLEDS, E8REDS, E8RLEDS, E8SRLEDS 1996
E4RDHCCS, E4RDHLCCS 1988
E4RDHCDE 1986
E4RDHCEC, E4RDHLCEC 1989
E4RDHCUD, E4RDHLCUD 1987
E4RDHEIA, E4RDHLEIA 1991
E4RDHENM, E4RDHLENM 1992
E4RDHEOD, E4RDHLEOD 1995
E4RDHERE, E4RDHLERE 1994
E4RDHESR, E4RDHLESR 1990
E4RDHETB, E4RDHLETB 1993
E5DRECR, E5DRLECR 1998
E5R4EEM, E5RB4EER, E5RBL4EER, E5RL4EEM, E6R4EEM, E6RL4EEM 1999
E5R4EEM, E5RB4EER, E5RBL4EER, E5RL4EEM 1999
E5R4SIE, E5RL4SIE, E6R4SIE, E6RL4SIE 2001
E5R4SIE, E5RL4SIE 2001
E5R4SSB, E5RL4SSB, E6R4SSB, E6RL4SSB 2000
E5R4SSB, E5RL4SSB 2000
E6R4EEM, E6RL4EEM 1999
E6R4SIE, E6RL4SIE 2001
E6R4SSB, E6RL4SSB 2000
E6RCCS, E6RLCCS, E6SLCCS 1988
E6RCDE, E6RLCDE, E6SLCDE 1986
E6RCEC, E6RLCEC, E6SLCEC 1989
E6RCOB, E6RLCOB, E6SLCOB 1985
E6RCUD, E6RLCUD, E6SLCUD 1987
E6REIA, E6RLEIA, E6SLEIA 1991
E6RENM, E6RLENM, E6SLENM 1992
E6REOD, E6RLEOD, E6SLEOD 1995
E6RERE, E6RLERE, E6SLERE 1994
E6RESR, E6RLESR, E6SLESR 1990
E6RETB, E6RLETB, E6SLETB 1993
E8DREEA 1999
E8DRSSM 2000
E8RCCS, E8RLCCS, E8SRLCCS 1988
E8RCDE, E8RLCDE, E8SRLCDE 1986
E8RCEC, E8RLCEC, E8SRLCEC, TE8RCEC, TE8RLCEC 1989
E8RCOB, E8RLCOB, E8SRLCOB 1985
E8RCUD, E8RLCUD, E8SRLCUD 1987
E8RECR, E8RLECR, E8SRLECA 1998
E8REIA, E8RLEIA, E8SRLEIA 1991
E8RENM, E8RLENM, E8SRLENM 1992
E8REOD, E8RLEOD, E8SRLEOD 1995
E8RERE, E8RLERE, E8SRLERE 1994
E8RESR, E8RLESR, E8SRLESR, TE8RLESCF 1990
E8RETB, E8RLETB, E8SRLETB 1993
E8REUC, E8RLEUC, E8SRLEUC 1997
E8WREES, E8WRLEES 1999
E8WRLSIR, E8WRSIR 2001
E8WRLSSC, E8WRSSC 2000
HE6FRECA, HE6FRLECA 1998
HE6FREUR, HE6FRLEUR 1997
Information:
Drain
Pressurized System: Hot coolant can cause serious burns. To open the cooling system filler cap, stop the engine and wait until the cooling system components are cool. Loosen the cooling system pressure cap slowly in order to relieve the pressure.
Stop the engine and allow the engine to cool. Loosen the cooling system filler cap slowly in order to relieve any pressure. Remove the cooling system filler cap.
Open the cooling system drain valve (if equipped). If the cooling system is not equipped with a drain valve, remove the cooling system drain plugs. Allow the coolant to drain.
Dispose of used engine coolant properly or recycle. Various methods have been proposed to reclaim used coolant for reuse in engine cooling systems. The full distillation procedure is the only method acceptable by Caterpillar to reclaim the used coolant.
For information regarding the disposal and the recycling of used coolant, consult your Caterpillar dealer or consult Dealer Service Tools.Flush
Flush the cooling system with clean water in order to remove any debris.
Close the drain valve (if equipped). Clean the drain plugs. Install the drain plugs. Refer to Torque Specifications, SENR3130 for more information on the correct torques.
Do not fill the cooling system faster than 5 L (1.3 US gal) per minute to avoid air locks.Cooling system air locks may result in engine damage.
Fill the cooling system with clean water. Install the cooling system filler cap.
Start and run the engine at low idle until the temperature reaches 49 to 66 °C (120 to 150 °F).
Stop the engine and allow the engine to cool. Loosen the cooling system filler cap slowly in order to relieve any pressure. Remove the cooling system filler cap. Open the drain valve (if equipped) or remove the cooling system drain plugs. Allow the water to drain. Flush the cooling system with clean water. Close the drain valve (if equipped). Clean the drain plugs. Install the drain plugs. Refer to Torque Specifications, SENR3130 for more information on the correct torques. Fill
Do not fill the cooling system faster than 5 L (1.3 US gal) per minute to avoid air locks.Cooling system air locks may result in engine damage.
Fill the cooling system with Extended Life Coolant (ELC). Refer to this Operation and Maintenance Manual, "Refill Capacities and Recommendations" topic (Maintenance Section) for more information on cooling system specifications. Do not install the cooling system filler cap.
Start and run the engine at low idle. Increase the engine rpm to high idle. Run the engine at high idle for 1 minute in order to purge the air from the cavities of the engine block. Stop the engine.
Check the coolant level. Maintain the coolant level within 13 mm (0.5 inch) below the bottom of the pipe for filling. Maintain the coolant level within 13 mm (0.5 inch) to the proper level on the sight glass (if equipped).
Clean the cooling system filler cap. Inspect the gasket that is on the cooling system filler cap. If the gasket that is on the cooling system filler cap is damaged, discard the old cooling system filler cap and install a new cooling system filler cap. If the gasket that is on the cooling system filler cap is not damaged, use a 9S-8140 Pressurizing Pump in order to pressure test the cooling system filler cap. The correct pressure for the cooling system filler cap is stamped on the face of the cooling system filler cap. If the cooling system filler cap does not retain the correct pressure, install a new cooling system filler cap.
Start the engine. Inspect the cooling system for leaks and for proper operating temperature.
Parts screen EVINRUDE:
0312675

0312675 SCREEN,Filter
100193A, 100293R, 100882B, 100990S, 115083D, 115393M, 115493B, 115593, 115693D, 115790S, 115793S, 115890C, 115983E, 125183C, 125283R, 135383M, 135443B, 135543E, 135643D, 150840S, 150940C, 175740S, 200640S, 25702H, 25802C, 25904R, 33002M, 33802M, 3390
0312633

0312633 SCREEN, Fuel filter
10424G, 10524C, 10624G, 10724A, 10824M, 10924B, 15404G, 15504C, 15604A, 18102S, 18202R, 18304A, 18802A, 18902B, 25002C, 25102S, 25202R, 25302A, 25402M, 25502B, 25602E, 25902B, 3802A, 4006E, 4106D, 4206S, 4306C, 4406R, 4506A, 4606M, 4706B, 4806E, 4902
0305344
0305344 SCREEN
B25JREUR, BE10EEDD, BE10RELEUS, BE15EEDS, BE15RELEUC, BE20SEECB, BE20SEEDA, BE20SEEUM, BE20SRECB, BE20SREDA, BE20SREUM, BE25BAECM, BE25BAEDR, BE25EECE, BE25EEDM, BE25EEUB, BE30BAECS, BE30BAEDE, BE30BAEEC, BE30BAEUD, BE30BASIA, BE30BASSR, BE30EECS, BE
0309949
0333695
0333695 SCREEN, Vent
B25JREUR, BE10FAEDC, BE10FAEUR, BE10FDLECM, BE10FDLEDR, BE10FDLEUA, BE15FAEDR, BE15FAEUA, BE15FDLECM, BE20SREUM, BE30BAEUD, BE5DREDS, BE5DREUC, BE5FRBECC, BE5FRBEUS, BE6DRECR, BE6DREDS, BE6DREUC, BE8FRBECA, BE8FRBEDC, BE8FRBEUR, BE8RCB, BE8RCH, BE8RC
0338520
0338520 SCREEN ASSY., Oil filter
BE10FAEDC, BE10FAEUR, BE10FDLECM, BE10FDLEDR, BE10FDLEUA, BE15FAEDR, BE15FAEUA, BE15FDLECM, BE5FRBECC, BE5FRBEUS, BE8FRBECA, BE8FRBEDC, BE8FRBEUR, E105WELEEN, E105WELSIF, E105WELSSC, E105WRLEES, E105WRLSIF, E105WRLSSC, E10EBL4EEB, E10EL4SID, E10EL4SS

