F5H077 IGNITION KEY SWITCH Force
H0202B80L, H0202B81M, H0202H79K, H0202H82N, H0252B83G, H0252H78C, H0252H78D, H0257F88A, H0257F88B, H0306B80C, H0307H81D, H0350H78L, H0352F90B, H0352F90C, H0353E91B, H0355D89A, H0356F89B, H0357C86A, H0357C87A, H0357C88B, H0357F88A, H0357F89C, H0357G90
IGNITION

Price: query
Rating:
Number on catalog scheme:  

Compatible models:
H0202B80L
H0202B81M
H0202H79K
H0202H82N
H0252B83G
H0252H78C
H0252H78D
H0257F88A
H0257F88B
H0306B80C
H0307H81D
H0350H78L
H0352F90B
H0352F90C
H0353E91B
H0355D89A
H0356F89B
H0357C86A
H0357C87A
H0357C88B
H0357F88A
H0357F89C
H0357G90A
H0357H83N
H0456B78J
H0456B79K
H0456B80L
H0457H82N
H0457H83P
H0503H84B
H0504H88C
H0504H88D
H0504P89B
H0505C89B
H0507A89C
H0507A89D
H0507A90A
H0507A90B
H0507A90C
H0507A90D
H0507B85A
H0507C86A
H0507C87A
H0507C87C
H0507C88B
H0507F87B
H0507F88A
H0507H81A
H0507H82B
H0507Z89B
H0558H79L
H0559B80M
H0559H78K
H0559H80N
H0559H83R
H0606H84A
H0700H79A
H0709B79A
H0750H79A
H0756H80F
H0756H81G
H0756H82H
H0757B79E
H0757H78D
H0758H80B
H0758H82E
H0759H79A
H0850H79A
H0850H80A
H0850H81C
H0851H79A
H0851X88A
H0853F88B
H0853F89C
H0853F89E
H0853F89F
H0853F89G
H0855H79A
H0856A89A
H0856A89H
H0856B80H
H0856C87A
H0856C87B
H0856F84A
H0856F85A
H0856F86A
H0856H82K
H0856L89D
H0856Y89B
H0857B78F
H0857H79G
H0858B80C
H0858B82E
H0858C84H
H0859B79B
H0859H77A
H0903F90B
H0903F90C
H0906A90A
H0906R83D
H1000H79A
H1004H79A
H1006B80B
H1006B81C
H1007H79A
H1008H80A
H1008H83C
H1057B78H
H1058H82G
H1058V83H
H1150H79A
H1151H79A
H1154B79A
H1155H79A
H1156H80C
H1156H81D
H1157B79B
H1157H78A
H1158B82E
H1158H80D
H1158H84G
H1159H77A
H1159H78B
H1159H79C
H1251A88A
H1251A88B
H1251A88C
H1251A89A
H1251A89B
H1251A89C
H1251A89D
H1251A89E
H1251F84A
H1251F86A
H1251F87A
H1251F87B
H1251X85A
H1258H81A
H1400H79A
H1401H79A
H1405H79A
H1406H80C
H1406H81D
H1407B79B
H1407H78A
H1408B80C
H1408H82D
H1408H83E
H1409H78A
H1409H79B
Force
Force entire parts catalog list:
- ACCESSORIES » F5H077
- ACCESSORIES » F5H077
- ACCESSORIES » F5H077
- ACCESSORIES » F5H077
- ACCESSORIES » F5H077
- ACCESSORIES » F5H077
- ACCESSORIES » F5H077
- REMOTE CONTROL » F5H077
- ACCESSORIES » F5H077
- REMOTE CONTROL » F5H077
- ACCESSORIES » F5H077
- ACCESSORIES » F5H077
- ACCESSORIES » F5H077
- ACCESSORIES » F5H077
- REMOTE CONTROL » F5H077
- ACCESSORIES » F5H077
- 5H246 TILLER HANDLE KIT » F5H077
- REMOTE CONTROL » F5H077
- ACCESSORIES » F5H077
- 5H246 TILLER HANDLE KIT » F5H077
- 5H246 TILLER HANDLE KIT » F5H077
- REMOTE CONTROL » F5H077
- REMOTE CONTROL » F5H077
- ACCESSORIES » F5H077
- ACCESSORIES » F5H077
- ACCESSORIES » F5H077
- REMOTE CONTROL » F5H077
- ACCESSORIES » F5H077
- REMOTE CONTROL MODEL 5H199 » F5H077
- ACCESSORIES » F5H077
- REMOTE CONTROL » F5H077
- ACCESSORIES » F5H077
- 5H246 TILLER HANDLE KIT » F5H077
- REMOTE CONTROL » F5H077
- ACCESSORIES » F5H077
- 5H246 TILLER HANDLE KIT » F5H077
- ACCESSORIES » F5H077
- ACCESSORIES » F5H077
- ACCESSORIES » F5H077
- ACCESSORIES » F5H077
- ACCESSORIES » F5H077
- ACCESSORIES » F5H077
- SPECIAL TOOLS - ACCESSORIES » F5H077
- REMOTE CONTROL » F5H077
- ACCESSORIES » F5H077
- REMOTE CONTROL » F5H077
- ACCESSORIES » F5H077
- ACCESSORIES » F5H077
- REMOTE CONTROL » F5H077
- ACCESSORIES » F5H077
- REMOTE CONTROL » F5H077
- ACCESSORIES » F5H077
- REMOTE CONTROL » F5H077
- ACCESSORIES » F5H077
- SPECIAL TOOLS - ACCESSORIES » F5H077
- REMOTE CONTROL » F5H077
- REMOTE CONTROL » F5H077
- ACCESSORIES » F5H077
- REMOTE CONTROL » F5H077
- ACCESSORIES » F5H077
- REMOTE CONTROL » F5H077
- ACCESSORIES » F5H077
- ACCESSORIES » F5H077
- ACCESSORIES » F5H077
- ACCESSORIES » F5H077
- REMOTE CONTROL » F5H077
- ACCESSORIES » F5H077
- ACCESSORIES » F5H077
- REMOTE CONTROL » F5H077
- ACCESSORIES » F5H077
- REMOTE CONTROL » F5H077
- ACCESSORIES » F5H077
- ACCESSORIES » F5H077
- ACCESSORIES » F5H077
- REMOTE CONTROL » F5H077
- ACCESSORIES » F5H077
- ACCESSORIES » F5H077
- ACCESSORIES » F5H077
- ACCESSORIES » F5H077
- ACCESSORIES » F5H077
- SPECIAL TOOLS - ACCESSORIES » F5H077
- ACCESSORIES » F5H077
- ACCESSORIES » F5H077
- ACCESSORIES » F5H077
- ACCESSORIES » F5H077
- ACCESSORIES » F5H077
- ACCESSORIES » F5H077
- ACCESSORIES » F5H077
- ACCESSORIES » F5H077
- ACCESSORIES » F5H077
- ACCESSORIES » F5H077
- ACCESSORIES » F5H077
- ACCESSORIES » F5H077
- ACCESSORIES » F5H077
- ACCESSORIES » F5H077
- SPECIAL TOOLS - ACCESSORIES » F5H077
- ACCESSORIES » F5H077
- REMOTE CONTROL » F5H077
- ACCESSORIES » F5H077
- REMOTE CONTROL » F5H077
- ACCESSORIES » F5H077
- ACCESSORIES » F5H077
- ACCESSORIES » F5H077
- ACCESSORIES » F5H077
- ACCESSORIES » F5H077
- ACCESSORIES » F5H077
- ACCESSORIES » F5H077
- ACCESSORIES » F5H077
- ACCESSORIES » F5H077
- ACCESSORIES » F5H077
- REMOTE CONTROL » F5H077
- ACCESSORIES » F5H077
- ACCESSORIES » F5H077
- ACCESSORIES » F5H077
- ACCESSORIES » F5H077
Information:
Introduction
Table 1
Revision History
Revision Summary of Changes
06 Added Effectivity
05 Added prefix, GK6, ME6, PF6, S7E, TE9, W6E, Z9E, BT9, K56, K57, K58, GZ8, GW8, GG8, GG9, GX8, GK8, GWT.
04 Added prefix K2D, HFB, D5T, LW5, PN5, RE5, TP5, WE5 The problem that is identified below does not have a known permanent solution. Until a permanent solution is known, use the solution that is stated below.Problem
The machines that are listed above may experience one of the issues that are stated below.
No start situation
Engine ECM unavailable in Cat® Electronic Technician (ET)
Inability to flash the ECM using ERTECM failures are rare and these issues are typically due to the machine starting circuit, machine low-pressure fuel system, or improper flashing.Solution
Do not operate or work on this product unless you have read and understood the instruction and warnings in the relevant Operation and Maintenance Manuals and relevant service literature. Failure to follow the instructions or heed the warnings could result in injury or death. Proper care is your responsibility.
Table 2
Troubleshooting Test Steps Value Results
1. Determine the Diagnostic Code.
A. Establish communication between Cat® Electronic Technician (ET) and the ECM. Refer to Troubleshooting, "Electronic Service Tools", if necessary.
B. Check for active codes and check for logged codes on Cat ET.
C. Check Cat ET for any associated codes. Troubleshoot any active codes before continuing with this procedure.
Diagnostic code
Result: An associated code is active or logged.
Repair: Troubleshoot any associated codes before continuing with this procedure.
Result: An associated code is not active or logged.
Proceed to Test Step 2.
2. Check the Machine Electrical System.
A. Check that Cat ET can connect to the engine ECM with Key Switch ON.
Machine electrical system
Result: Cat ET can connect to the engine ECM, then the engine ECM is turned on.
Proceed to Test Step 3.
Result: Cat ET cannot connect to the engine ECM, and the machines starting circuit is not providing power to the engine ECM.
Repair: Go to Troubleshooting, "Electrical Power Supply - Test".
Check all grounds on the engine harness. This includes ground wires attached to the engine block, battery, and chassis ground studs. There have been known instances where ground wires were found loose, broken, or faulty through rust or paint.
For the 308E2, the engine ECM is typically being ordered, when PI32292 is being performed and the engine ECM did not flash. If the flashing procedure was not followed properly, it will appear that the engine ECM is dead since it cannot be seen by Cat ET. However, it can still be flashed by following Special Instruction, REHS9223, "Obtaining a DPK Flash File and Flashing Procedure with the Engine Reprogramming Tool" steps.
3. Check the Fuel System.
A. Visually check the fuel level in the fuel tank. Do not rely on the fuel gauge only.
B. Ensure that the vent in the fuel cap is not filled with debris.
C. Inspect the fuel system for external leaks. Ensure that there is no air in the clear bowl on the primary fuel filter.
D. Check that there are no external leaks, no air in the clear primary fuel filter. Change the primary fuel filter and the in-line filter for the fuel transfer pump.
E. Check fuel quality. Refer to Testing and Adjusting, "Fuel Quality - Test", for the proper procedure. Check the fuel tank for debris or foreign objects which may block the fuel supply.
F. Check for the proper operation of the fuel transfer pump. Replace the pre-filter if excessive contamination or if the maintenance interval is exceeded. Refer to Testing and Adjusting, "Fuel System", for test information.
Confirm fuel flow rate from transfer pump (dead head the pump for correct results):
SSL, MTL, CTL, and CWL - .5 gal per min @ 12 psi MHE - .09 gal per min @ 5 psi
Fuel Level
Result: The fuel system is OK.
Proceed to Test Step 4.
Result: The fuel system is not OK.
Repair: Replace the fuel filters. Clean the primary filter/water separator of debris. Refer to the Operation and Maintenance Manual for details.
4. Restrictions in the Air Inlet and Exhaust System.
A. Check for an air filter restriction indicator.
B. Check the air inlet and exhaust system for restrictions and/or leaks. To test the exhaust system, the DOC inlet temperature sensor can be removed to ensure the DOC/DPF are not plugged.
Air and exhaust system restrictions
Result: There are no system restrictions.
Proceed to Test Step 5.
Result: There are system restrictions.
Repair: Refer to Systems Operation, "Air Inlet and Exhaust System", for additional information on the air inlet and exhaust systems.
Replace plugged air filters. Refer to the Operation and Maintenance Manual for the correct procedure. If the DOC and/or DPF are plugged and not at the 3000 hour service interval, determine the root cause of premature plugging. Submit a DSN ticket if technical assistance is needed.
5. Swap Engine ECM with another similar machine.
A. Swapping an engine ECM is recommended to troubleshoot a true engine ECM failure before ordering a new engine ECM.
Engine ECMs can only be swapped with the same engine model.
Prefixes SSL, MTL, CTL, and CWL can be temporarily swapped. SSL, MTL, and CTL machines that are XHP can only be interchanged with each other.
MHE engine ECM cannot be swapped with other product families.
Note: Machine sales models that have the C3.3B engines that use the 436-0821 Monitoring Control are:
236D, 242D, 246D, 257D, 259D, 262D, 277D, 279D, 287D, 289D, 906M, 907M, 908M, 308E
Machine sales models that have the C3.8 engines that use the 392-4121 Electronic Control Gp are:
272D, 272D XHP, 299D, 229D XHP, 910K, 914K
Machine sales models that have the C3.8 Tier 4 Final engines that use the 458-9392 Electronic Control Gp are:
272D2, 272D2 XHP, 297D2, 297D2 XHP, 299D2, 299D2 XHP
Engine ECM
Result: The engine ECM from another machine resolves issue.
Repair: Verify that the problem is resolved, submit a DSN ticket with the completed troubleshooting results and PSR prior to ordering an engine ECM. This will help document any trends or potential issues to the product group.
Result: The ECM swap does not resolve issue.
STOP If the procedure did not correct the issue, contact your Cat dealer Technical Communicator (TC). For further assistance, your TC can confer with the Dealer Solutions Network (DSN).
Parts ignition Force:
F74H20
F74H20 IGNITION SWITCH W/KEY AND MOUNTING NUT (ACCESSORY ITEM)
H0252H77B, H0254H75A, H0351H76K, H0356H75F, H0456B78J, H0555H74G, H0559H77H, H0559H77J, H0659B78B, H0757H75A, H0757H76C, H0857B78F, H0859H77A, H0859H78A, H1059H76D, H1059H77G, H1159H77A, H1209H76F
F71H21
F71H21 IGNITION SWITCH MOUNTING KIT (ACCESSORY ITEM)
H0252H77B, H0254H75A, H0351H76K, H0356H75F, H0456B78J, H0555H74G, H0559H77H, H0559H77J, H0559H78K, H0659B78B, H0757H75A, H0757H76C, H0857B78F, H0859H77A, H1059H76D, H1059H77G, H1159H77A, H1209H76F
F74H19
F74H19 IGNITION KEY SWITCH
H0252H77B, H0254H75A, H0351H76K, H0356H75F, H0559H77H, H0559H77J, H0559H78K, H0659B78B, H0757H75A, H0757H76C, H0859H78A, H1059H76D, H1059H77G, H1209H76F
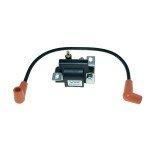
F510475
F510475 IGNITION COIL
H0091B80B, H0091H79A, H0091H83C, H0091H84D, H0092H79F, H0092H81H, H0092H81J, H0095B80F, H0095B81G, H0095H82H, H0101B78A, H0102H76C, H0102H78E, H0121B79A, H0122H79E, H0125H79E, H0152B78D, H0152B83J, H0152C84K, H0152H79E, H0202B81M, H0202H79K, H0252B83
FS474475
F5H078
F5H078 IGNITION KEY SWITCH
H0091H83C, H0091H84D, H0095B81G, H0095H82H, H0202B80L, H0202B81M, H0202H79K, H0202H82N, H0252B83G, H0252H78C, H0252H78D, H0257F88A, H0257F88B, H0306B80C, H0307H81D, H0350H78L, H0352F90B, H0352F90C, H0353E91A, H0353E91B, H0355D89A, H0356F89B, H0357C86
FT8953
FT8953 IGNITION TESTER
H0060B78B, H0060H79C, H0060H80D, H0062H79K, H0064H80F, H0067H79C, H0070B79A, H0071H81B, H0071H82C, H0071H83D, H0071H84E, H0072B81D, H0072H79B, H0072H80C, H0072H82E, H0091B80B, H0091H79A, H0091H83C, H0091H84D, H0092B80G, H0092H79F, H0092H81H, H0092H81
F615475
F615475 IGNITION COIL
H0559H83R, H0606H84A, H0851X88A, H0856C87A, H0856C87B, H0856F84A, H0856F85A, H0856F86A, H0856H82K, H0858C84H, H0906R83D, H1158H84G, H1251A88A, H1251A88B, H1251F84A, H1251F86A, H1251F87A, H1251F87B, H1251X85A, H1258H81A