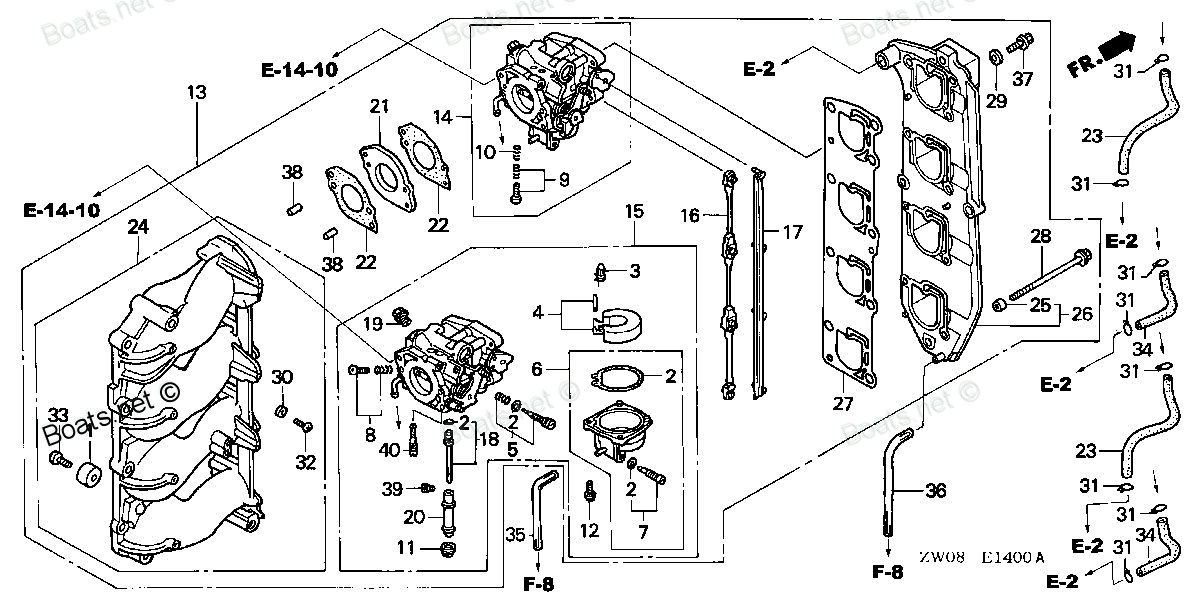
16150-ZW1-000 JET SET (#40) (Honda Code 4897781). Honda
BF75A1 LHTA, BF75A1 LRTA, BF75A1 XRTA, BF90A1 JHTA, BF90A1 JRTA, BF90A1 LHTA, BF90A1 LRTA, BF90A1 XRTA, BF90A2 JHTA, BF90A2 JRTA, BF90A2 LHTA, BF90A2 LRTA, BF90A2 XRTA, BF90A3 JHTA, BF90A3 JRTA, BF90A3 LHTA, BF90A3 LRTA, BF90A3 XRTA, BF90A4 JHTA, BF9
JET
 (Honda Code 4897781). Honda parts")
Price: query
Rating:
You can buy parts:
As an associate, we earn commssions on qualifying purchases through the links below

Replacement Part For Honda Jet Set (#40) 16150-Zw1-000 T3Boat08154
Generic Precision Engineering: Meticulously engineered for precision fit. || Rust-Resistant Coating: Specially treated with a rust-resistant coating to enhance durability and extend product lifespan. || Universal Fit: Designed with universal compatibility, ensuring they work seamlessly with a wide range of machinery. || Enhanced Safety: Built to meet or exceed safety standards, providing reliable protection and performance under extreme conditions. || Cost-Effective Solution: Offers a high-quality alternative, delivering excellent value.
Generic Precision Engineering: Meticulously engineered for precision fit. || Rust-Resistant Coating: Specially treated with a rust-resistant coating to enhance durability and extend product lifespan. || Universal Fit: Designed with universal compatibility, ensuring they work seamlessly with a wide range of machinery. || Enhanced Safety: Built to meet or exceed safety standards, providing reliable protection and performance under extreme conditions. || Cost-Effective Solution: Offers a high-quality alternative, delivering excellent value.

$43.26
09-02-2024
US: HaponiukShoop
KINGDOM HARVEST for Honda Original Equipment Jet Set (#40) - 16150-ZW1-000
KINGDOM HARVEST For Honda Original Equipment Jet Set (#40) - 16150-ZW1-000 || for honda original equipment jet set (#40) 16150zw1000: || constructed to strict for honda original equipment specifications || direct fit for easy installation || Lawn Care Made Easy with Our Replacement Parts!
KINGDOM HARVEST For Honda Original Equipment Jet Set (#40) - 16150-ZW1-000 || for honda original equipment jet set (#40) 16150zw1000: || constructed to strict for honda original equipment specifications || direct fit for easy installation || Lawn Care Made Easy with Our Replacement Parts!
Number on catalog scheme: 18
Compatible models:
BF75A1 LHTA
BF75A1 LRTA
BF75A1 XRTA
BF90A1 JHTA
BF90A1 JRTA
BF90A1 LHTA
BF90A1 LRTA
BF90A1 XRTA
BF90A2 JHTA
BF90A2 JRTA
BF90A2 LHTA
BF90A2 LRTA
BF90A2 XRTA
BF90A3 JHTA
BF90A3 JRTA
BF90A3 LHTA
BF90A3 LRTA
BF90A3 XRTA
BF90A4 JHTA
BF90A4 JRTA
BF90A4 LHTA
BF90A4 LRTA
BF90A4 XRTA
BF90A5 JHTA
BF90A5 JRTA
BF90A5 LHTA
BF90A5 LRTA
BF90A5 XRTA
BF90A6 JHTA
BF90A6 JRTA
BF90A6 LHTA
BF90A6 LRTA
BF90A6 XRTA
BF90AT LHTA
BF90AT LRTA
BF90AT XRTA
BF90AW JHTA
BF90AW JRTA
BF90AW LHTA
BF90AW LRTA
BF90AW XRTA
BF90AX JHTA
BF90AX JRTA
BF90AX LHTA
BF90AX LRTA
BF90AX XRTA
BF90AY JHTA
BF90AY JRTA
BF90AY LHTA
BF90AY LRTA
BF90AY XRTA
Honda
Honda entire parts catalog list:
- CARBURETOR » 16150-ZW1-000
- CARBURETOR » 16150-ZW1-000
- CARBURETOR » 16150-ZW1-000
- CARBURETOR » 16150-ZW1-000
- CARBURETOR » 16150-ZW1-000
- CARBURETOR » 16150-ZW1-000
- CARBURETOR » 16150-ZW1-000
- CARBURETOR » 16150-ZW1-000
- CARBURETOR » 16150-ZW1-000
- CARBURETOR » 16150-ZW1-000
- CARBURETOR » 16150-ZW1-000
- CARBURETOR » 16150-ZW1-000
- CARBURETOR » 16150-ZW1-000
- CARBURETOR » 16150-ZW1-000
- CARBURETOR » 16150-ZW1-000
- CARBURETOR » 16150-ZW1-000
- CARBURETOR » 16150-ZW1-000
- CARBURETOR » 16150-ZW1-000
- CARBURETOR » 16150-ZW1-000
- CARBURETOR » 16150-ZW1-000
- CARBURETOR » 16150-ZW1-000
- CARBURETOR » 16150-ZW1-000
- CARBURETOR » 16150-ZW1-000
- CARBURETOR » 16150-ZW1-000
- CARBURETOR » 16150-ZW1-000
- CARBURETOR » 16150-ZW1-000
- CARBURETOR » 16150-ZW1-000
- CARBURETOR » 16150-ZW1-000
- CARBURETOR » 16150-ZW1-000
- CARBURETOR » 16150-ZW1-000
- CARBURETOR » 16150-ZW1-000
- CARBURETOR » 16150-ZW1-000
- CARBURETOR » 16150-ZW1-000
- CARBURETOR » 16150-ZW1-000
- CARBURETOR » 16150-ZW1-000
- CARBURETOR » 16150-ZW1-000
- CARBURETOR » 16150-ZW1-000
- CARBURETOR » 16150-ZW1-000
- CARBURETOR » 16150-ZW1-000
- CARBURETOR » 16150-ZW1-000
- CARBURETOR » 16150-ZW1-000
- CARBURETOR » 16150-ZW1-000
- CARBURETOR » 16150-ZW1-000
- CARBURETOR » 16150-ZW1-000
- CARBURETOR » 16150-ZW1-000
- CARBURETOR » 16150-ZW1-000
- CARBURETOR » 16150-ZW1-000
- CARBURETOR » 16150-ZW1-000
- CARBURETOR » 16150-ZW1-000
- CARBURETOR » 16150-ZW1-000
- CARBURETOR » 16150-ZW1-000
Information:
Table 1
Required Tools
Tool Part Number Part Description Qty
A 370-8376 Capping Kit 1
Ensure that all adjustments and repairs that are carried out to the fuel system are performed by authorized personnel that have the correct training.Before beginning ANY work on the fuel system, refer to Operation and Maintenance Manual, "General Hazard Information and High-Pressure Fuel Lines" for safety information.Refer to System Operation, Testing and Adjusting, "Cleanliness of Fuel System Components" for detailed information on the standards of cleanliness that must be observed during ALL work on the fuel system.
Care must be taken to ensure that fluids are contained during performance of inspection, maintenance, testing, adjusting and repair of the product. Be prepared to collect the fluid with suitable containers before opening any compartment or disassembling any component containing fluids.Dispose of all fluids according to local regulations and mandates.
Turn the fuel supply to the OFF position.
Illustration 1 g06196910
For the correct location of the secondary filter. Refer to the Original Equipment Manufacturer (OEM) for the correct location.
Place a suitable container below the secondary filter to catch any fuel that might be spilled. Loosen drain valve (6) on canister (5) and drain the fuel. Refer to Operation and Maintenance Manual, "Fuel System Secondary Filter - Replace" for the correct drain procedure.
If necessary, remove fuel filter (4) (not shown) from canister (5). Refer to Operation and Maintenance Manual, "Fuel System Secondary Filter - Replace" for the correct procedure.
Make temporary identification marks on tube assemblies to show the correct position of the tube assemblies.
Disconnect the tube assemblies from connection (1) and connection (2) from fuel filter base (3).
Use Tooling (A) to plug the tube assemblies with new plugs.
Use Tooling (A) to cap connection (1) and connection (2).
Remove the bolts from the assembly of fuel filter base (3) and remove from the OEM bracket. Support the weight of the assembly of fuel filter base as the bolts are removed.
Illustration 2 g06196948
If necessary, follow Step 10a through Step 10b to disassemble the assembly of secondary filter (3).
Place the assembly of secondary filter base (3) in a suitable support.
Remove canister (5) and remove filter (4). Refer to Operation and Maintenance Manual, "Fuel System Secondary Filter - Replace" for the correct procedure.Installation Procedure
Ensure that all adjustments and repairs that are carried out to the fuel system are performed by authorized personnel that have the correct training.Before beginning ANY work on the fuel system, refer to Operation and Maintenance Manual, "General Hazard Information and High-Pressure Fuel Lines" for safety information.Refer to System Operation, Testing and Adjusting, "Cleanliness of Fuel System Components" for detailed information on the standards of cleanliness that must be observed during ALL work on the fuel system.
Ensure that the secondary filter base is clean and free from damage. If necessary, replace the complete secondary filter base and filter assembly.
Illustration 3 g06196948
If necessary, follow Step 2a through Step 2b to assemble the assembly of secondary filter (3).
Place secondary filter base (3) in a suitable support.
Install a new filter (4) to canister (5). Refer to Operation and Maintenance Manual, "Fuel System Secondary Filter - Replace" for the correct procedure.
Illustration 4 g06197010
Position the assembly of secondary filter (3) onto the OEM bracket. Install the bolts. Tighten the bolts, refer to the OEM for the correct torque value.
If necessary, install a new fuel filter (4) (not shown) to fuel filter base (3). Refer to Operation and Maintenance Manual, "Fuel System Secondary Filter - Replace" for the correct procedure.
Remove caps connection (1) and connection (2).
Remove plugs from the tube assemblies.
Ensure that the plastic tube assemblies are installed in the original positions. Failure to connect the plastic tube assemblies to the correct ports will allow contamination to enter the fuel system. Allowing contamination to enter the fuel system will damage the engine.
Connect the tube assemblies to connection (1) and connection (2) to fuel filter base (3). Ensure that the tube assemblies are correctly orientated.
Turn the fuel supply to the ON position.End By:
Remove the air from the fuel system. Refer to Operation and Maintenance Manual, "Fuel System - Prime" for the correct procedure.
Parts jet Honda:
99103-MA1-0520

99103-MA1-0520 JET, SLOW (#52) (Honda Code 1261262).
BF75A1 LHTA, BF75A1 LRTA, BF75A1 XRTA, BF90A1 JHTA, BF90A1 JRTA, BF90A1 LHTA, BF90A1 LRTA, BF90A1 XRTA, BF90A2 JHTA, BF90A2 JRTA, BF90A2 LHTA, BF90A2 LRTA, BF90A2 XRTA, BF90A3 JHTA, BF90A3 JRTA, BF90A3 LHTA, BF90A3 LRTA, BF90A3 XRTA, BF90A4 JHTA, BF9
99112-HC4-1300
99112-HC4-1300 JET, MAIN (#130) (Honda Code 4901575).
BF90AT LHTA, BF90AT LRTA, BF90AT XRTA, BF90AX JHTA, BF90AX JRTA, BF90AX LHTA, BF90AX LRTA, BF90AX XRTA, BF90AY JHTA, BF90AY JRTA, BF90AY LHTA, BF90AY LRTA, BF90AY XRTA
99112-HC4-1320
99101-ZV5-1300
99101-ZV5-1300 JET, MAIN (#130) (Honda Code 4683629).
BF40A4 LHA, BF40A4 LHTA, BF40A4 LRTA, BF40A5 LHA, BF40A5 LHTA, BF40A5 LRTA, BF40A6 LHA, BF40A6 LHTA, BF40A6 LRTA, BF50A1 LHTA, BF50A1 LRA, BF50A1 LRTA, BF50A1 SRJA, BF50A1 XRTA, BF50A2 LHTA, BF50A2 LRA, BF50A2 LRTA, BF50A2 SRJA, BF50A2 XRTA, BF50A3 L
99101-ZV5-1320
99101-ZV5-1320 JET, MAIN (#132) (Honda Code 5688908).
BF40A4 LHA, BF40A4 LHTA, BF40A4 LRTA, BF40A5 LHA, BF40A5 LHTA, BF40A5 LRTA, BF40A6 LHA, BF40A6 LHTA, BF40A6 LRTA, BF50A4 LHTA, BF50A4 LRTA, BF50A4 SRJA, BF50A4 XRTA, BF50A5 LHTA, BF50A5 LRTA, BF50A5 SRJA, BF50A5 XRTA, BF50A6 LHTA, BF50A6 LRTA, BF50A6
99102-ZW1-1350
99102-ZW1-1350 JET, MAIN (135)
BF40A4 LHA, BF40A4 LHTA, BF40A4 LRTA, BF40A5 LHA, BF40A5 LHTA, BF40A5 LRTA, BF40A6 LHA, BF40A6 LHTA, BF40A6 LRTA, BF50A4 LHTA, BF50A4 LRTA, BF50A4 SRJA, BF50A4 XRTA, BF50A5 LHTA, BF50A5 LRTA, BF50A5 SRJA, BF50A5 XRTA, BF50A6 LHTA, BF50A6 LRTA, BF50A6