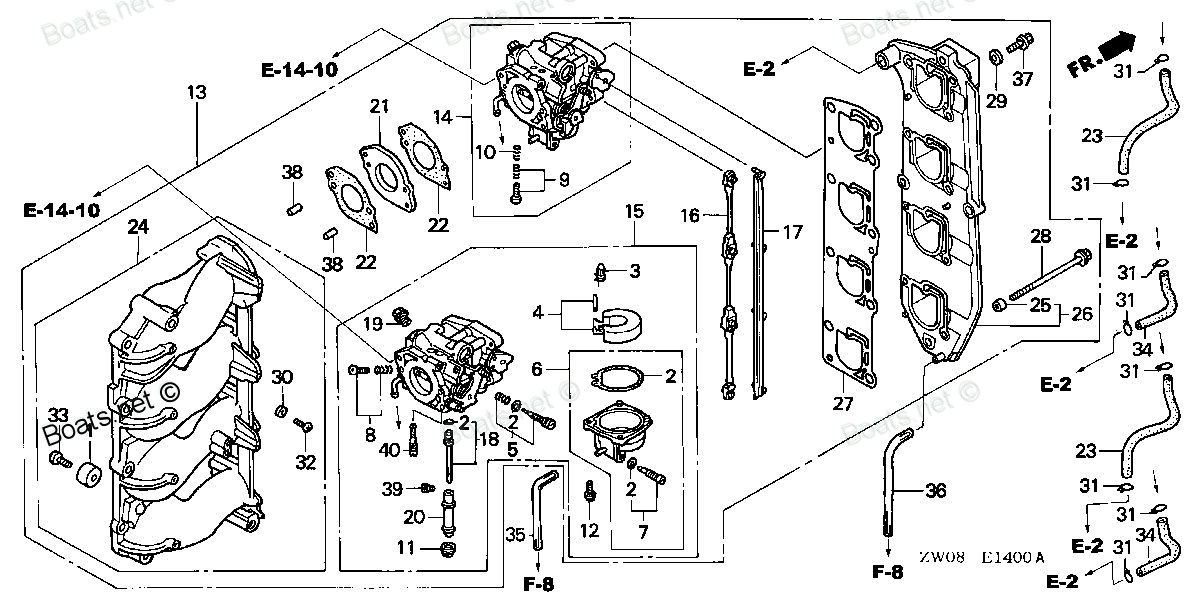
16142-ZW1-000 LEVER, LINK (Honda Code 4897757). Honda
BF75A1 LHTA, BF75A1 LRTA, BF75A1 XRTA, BF75A2 LHTA, BF75A2 LRTA, BF75A2 XRTA, BF75A3 LHTA, BF75A3 LRTA, BF75A3 XRTA, BF75A4 LHTA, BF75A4 LRTA, BF75A4 XRTA, BF75A5 LHTA, BF75A5 LRTA, BF75A5 XRTA, BF75A6 LHTA, BF75A6 LRTA, BF75A6 XRTA, BF75AT LHTA, BF7
LEVER
. Honda parts")
Price: query
Rating:
You can buy parts:
As an associate, we earn commssions on qualifying purchases through the links below

$64.72
07-06-2023
0.25[0.11] Pounds
-: -
Honda 16142-ZW1-000 Lever Link
Honda 16142-ZW1-000 Lever Link
Honda 16142-ZW1-000 Lever Link
Number on catalog scheme: 16
Compatible models:
BF75A1 LHTA
BF75A1 LRTA
BF75A1 XRTA
BF75A2 LHTA
BF75A2 LRTA
BF75A2 XRTA
BF75A3 LHTA
BF75A3 LRTA
BF75A3 XRTA
BF75A4 LHTA
BF75A4 LRTA
BF75A4 XRTA
BF75A5 LHTA
BF75A5 LRTA
BF75A5 XRTA
BF75A6 LHTA
BF75A6 LRTA
BF75A6 XRTA
BF75AT LHTA
BF75AT LRTA
BF75AT XRTA
BF75AW LHTA
BF75AW LRTA
BF75AW XRTA
BF75AX LHTA
BF75AX LRTA
BF75AX XRTA
BF75AY LHTA
BF75AY LRTA
BF75AY XRTA
BF90A1 JHTA
BF90A1 JRTA
BF90A1 LHTA
BF90A1 LRTA
BF90A1 XRTA
BF90A2 JHTA
BF90A2 JRTA
BF90A2 LHTA
BF90A2 LRTA
BF90A2 XRTA
BF90A3 JHTA
BF90A3 JRTA
BF90A3 LHTA
BF90A3 LRTA
BF90A3 XRTA
BF90A4 JHTA
BF90A4 JRTA
BF90A4 LHTA
BF90A4 LRTA
BF90A4 XRTA
BF90A5 JHTA
BF90A5 JRTA
BF90A5 LHTA
BF90A5 LRTA
BF90A5 XRTA
BF90A6 JHTA
BF90A6 JRTA
BF90A6 LHTA
BF90A6 LRTA
BF90A6 XRTA
BF90AT LHTA
BF90AT LRTA
BF90AT XRTA
BF90AW JHTA
BF90AW JRTA
BF90AW LHTA
BF90AW LRTA
BF90AW XRTA
BF90AX JHTA
BF90AX JRTA
BF90AX LHTA
BF90AX LRTA
BF90AX XRTA
BF90AY JHTA
BF90AY JRTA
BF90AY LHTA
BF90AY LRTA
BF90AY XRTA
Honda
Honda entire parts catalog list:
- CARBURETOR » 16142-ZW1-000
- CARBURETOR » 16142-ZW1-000
- CARBURETOR » 16142-ZW1-000
- CARBURETOR » 16142-ZW1-000
- CARBURETOR » 16142-ZW1-000
- CARBURETOR » 16142-ZW1-000
- CARBURETOR » 16142-ZW1-000
- CARBURETOR » 16142-ZW1-000
- CARBURETOR » 16142-ZW1-000
- CARBURETOR » 16142-ZW1-000
- CARBURETOR » 16142-ZW1-000
- CARBURETOR » 16142-ZW1-000
- CARBURETOR » 16142-ZW1-000
- CARBURETOR » 16142-ZW1-000
- CARBURETOR » 16142-ZW1-000
- CARBURETOR » 16142-ZW1-000
- CARBURETOR » 16142-ZW1-000
- CARBURETOR » 16142-ZW1-000
- CARBURETOR » 16142-ZW1-000
- CARBURETOR » 16142-ZW1-000
- CARBURETOR » 16142-ZW1-000
- CARBURETOR » 16142-ZW1-000
- CARBURETOR » 16142-ZW1-000
- CARBURETOR » 16142-ZW1-000
- CARBURETOR » 16142-ZW1-000
- CARBURETOR » 16142-ZW1-000
- CARBURETOR » 16142-ZW1-000
- CARBURETOR » 16142-ZW1-000
- CARBURETOR » 16142-ZW1-000
- CARBURETOR » 16142-ZW1-000
- CARBURETOR » 16142-ZW1-000
- CARBURETOR » 16142-ZW1-000
- CARBURETOR » 16142-ZW1-000
- CARBURETOR » 16142-ZW1-000
- CARBURETOR » 16142-ZW1-000
- CARBURETOR » 16142-ZW1-000
- CARBURETOR » 16142-ZW1-000
- CARBURETOR » 16142-ZW1-000
- CARBURETOR » 16142-ZW1-000
- CARBURETOR » 16142-ZW1-000
- CARBURETOR » 16142-ZW1-000
- CARBURETOR » 16142-ZW1-000
- CARBURETOR » 16142-ZW1-000
- CARBURETOR » 16142-ZW1-000
- CARBURETOR » 16142-ZW1-000
- CARBURETOR » 16142-ZW1-000
- CARBURETOR » 16142-ZW1-000
- CARBURETOR » 16142-ZW1-000
- CARBURETOR » 16142-ZW1-000
- CARBURETOR » 16142-ZW1-000
- CARBURETOR » 16142-ZW1-000
- CARBURETOR » 16142-ZW1-000
- CARBURETOR » 16142-ZW1-000
- CARBURETOR » 16142-ZW1-000
- CARBURETOR » 16142-ZW1-000
- CARBURETOR » 16142-ZW1-000
- CARBURETOR » 16142-ZW1-000
- CARBURETOR » 16142-ZW1-000
- CARBURETOR » 16142-ZW1-000
- CARBURETOR » 16142-ZW1-000
- CARBURETOR » 16142-ZW1-000
- CARBURETOR » 16142-ZW1-000
- CARBURETOR » 16142-ZW1-000
- CARBURETOR » 16142-ZW1-000
- CARBURETOR » 16142-ZW1-000
- CARBURETOR » 16142-ZW1-000
- CARBURETOR » 16142-ZW1-000
- CARBURETOR » 16142-ZW1-000
- CARBURETOR » 16142-ZW1-000
- CARBURETOR » 16142-ZW1-000
- CARBURETOR » 16142-ZW1-000
- CARBURETOR » 16142-ZW1-000
- CARBURETOR » 16142-ZW1-000
- CARBURETOR » 16142-ZW1-000
- CARBURETOR » 16142-ZW1-000
- CARBURETOR » 16142-ZW1-000
- CARBURETOR » 16142-ZW1-000
- CARBURETOR » 16142-ZW1-000
Information:
Illustration 1 g01150024
Components of the coolant level sensor (1) Sensor (2) Sensor probe (brass dowel) (3) Plastic coverCoolant level sensor (1) contains no moving parts. The sensor provides the same function as a switch. The state of the switch is dependent on the capacitance value that is detected at the probe of the sensor. The sensor contains a probe (2) that is covered with plastic (3) .When the sensor's probe is immersed in coolant, the sensor senses a particular capacitance. The sensor's electronics react by sinking the signal to the sensor return (ground).When the probe is not immersed in coolant, approximately +5 VDC is sourced to the signal wire. When this condition is detected by the Electronic Control Module (ECM), an event code is activated.Prior to troubleshooting any problems with the coolant level sensor, use Caterpillar Electronic Technician (ET) to check the installation status for the sensor. The coolant level sensor's configuration parameter must be set to "Installed" in order for the ECM to monitor the signal from the sensor.The activation of an event code and/or a warning lamp is probably caused by a low coolant level. The next likely cause is a problem with the wiring harness, a connector, or the sensor. The least likely cause is a problem with the ECM.
Illustration 2 g01365215
Schematic for coolant level sensor
Table 1
Troubleshooting Test Steps Values Results
1. Verify that the "Coolant Level Sensor" Parameter is Programmed Correctly
A. Remove electrical power from the ECM.
B. Connect the Cat ET to the service tool connector.
C. Restore electrical power to the ECM.
D. Establish communication with the ECM.
E. Verify that the "Coolant Level Sensor" parameter is programmed to "Installed".
F. Remove electrical power from the ECM.
The "Coolant Level Sensor" parameter is programmed to "Installed".
Result: The "Coolant Level Sensor" parameter is programmed correctly.
Proceed to Test Step 2.
Result: The "Coolant Level Sensor" parameter is not programmed correctly.
Program the "Coolant Level Sensor" parameter to "Installed".
Verify that the repair eliminates the problem.
Illustration 3 g01365227
Location of the coolant level sensor (typical left front engine view) (4) Coolant level sensor
Illustration 4 g01365249
Location of the ECM connectors (typical engine view) (5) J2/P2 connectors
Illustration 5 g01365250
Terminal locations at the P2 ECM connector for the coolant level sensor (P2-29) Digital sensor supply (P2-49) Coolant level (P2-92) Sensor return
Illustration 6 g01159881
Terminal locations at the harness connector for the coolant level sensor (Terminal A) Digital sensor supply (Terminal B) Sensor return (Terminal C) Sensor signal
Table 2
Troubleshooting Test Steps Values Results
2. Inspect the Electrical Connectors and the Wiring
A. Remove electrical power from the ECM.
B. Thoroughly inspect the connectors for sensor (4). Also, thoroughly inspect ECM connectors (5). Refer to Troubleshooting, "Electrical Connectors - Inspect" for details.
C. Perform a
45 N (10 lb) pull test on each of the wires that are associated with the circuit for the coolant level sensor.
D. Check the allen head screw on each ECM connector for the proper torque. Refer to Troubleshooting, "Electrical Connectors - Inspect" for the correct torque values.
All connectors, pins, and sockets are coupled completely and/or inserted, and the harness and wiring are free of corrosion, of abrasion or of pinch points.
Result: The harnesses and the wiring appear to be OK.
Proceed to Test Step 3.
Result: There is a problem with the connectors and/or the wiring.
Repair the wiring and connectors or replace the wiring or the connectors. Ensure that all of the seals are properly connected. Verify that the repair eliminates the problem.
Verify that the problem is resolved.
3. Check the Supply Voltage at the Sensor Connector
A. Disconnect the coolant level sensor at the sensor connector.
B. Restore electrical power to the ECM.
C. Measure the voltage between terminals A (digital sensor supply) and B (sensor return) at the harness connector for the coolant level sensor.
D. Remove electrical power from the ECM.
The voltage measurement is 8.0 0.4 VDC.
Result: The voltage measurement is 8.0 0.4 VDC. The supply voltage is reaching the sensor. Proceed to Test Step 4
Result: The voltage measurement is not 8.0 0.4 VDC.
The digital sensor supply voltage is not reaching the sensor. There is a problem in the circuit for the digital sensor supply. Refer to Troubleshooting, "Sensor Supply - Test".
4. Check the Coolant Level
A. Remove electrical power from the ECM.
B. Allow the engine to cool prior to removal of the cooling system pressure cap.
C. Check the coolant level. Refer to the Operation and Maintenance Manual for the proper procedure to check the coolant level.
The coolant is at the proper level.
Result: The coolant is at the proper level. Proceed to Test Step 5.
Result: The coolant level is low.
Add coolant according to the procedure in the Operation and Maintenance Manual.
There can be a leak in the cooling system. Identify the source of the coolant leak. Repair the leak.
5. Disconnect the Coolant Level Sensor and Monitor the Status for "Coolant Level"
A. Disconnect the harness con
Parts lever Honda:
99003-40000

99003-40000 LEVER, TIRE (Honda Code 0052456).
BF115A1 LA, BF115A1 LCA, BF115A1 XA, BF115A1 XCA, BF115AX LA, BF115AX LCA, BF115AX XA, BF115AX XCA, BF115AY LA, BF115AY LCA, BF115AY XA, BF115AY XCA, BF130A1 LA, BF130A1 LCA, BF130A1 XA, BF130A1 XCA, BF130AX LA, BF130AX LCA, BF130AX XA, BF130AX XCA,
24812-ZV5-000

24812-ZV5-000 LEVER, HANDLE LOCK (Honda Code 3703055).
BF115A1 LA, BF115A1 LCA, BF115A1 XA, BF115A1 XCA, BF115A2 LA, BF115A2 LCA, BF115A2 XA, BF115A2 XCA, BF115A3 LA, BF115A3 LCA, BF115A3 XA, BF115A3 XCA, BF115A4 LA, BF115A4 LCA, BF115A4 XA, BF115A4 XCA, BF115A5 LA, BF115A5 LCA, BF115A5 XA, BF115A5 XCA,
24878-ZV5-000
24878-ZV5-000 LEVER, IDLE (Honda Code 3703261).
BF115A1 LA, BF115A1 LCA, BF115A1 XA, BF115A1 XCA, BF115A2 LA, BF115A2 LCA, BF115A2 XA, BF115A2 XCA, BF115A3 LA, BF115A3 LCA, BF115A3 XA, BF115A3 XCA, BF115A4 LA, BF115A4 LCA, BF115A4 XA, BF115A4 XCA, BF115A5 LA, BF115A5 LCA, BF115A5 XA, BF115A5 XCA,
63201-ZW1-000ZA
63201-ZW1-000ZA LEVER, COVER LOCK *NH282MU* (Honda Code 4900429). (OYSTER SILVER METALLIC-U)
BF115A1 LA, BF115A1 LCA, BF115A1 XA, BF115A1 XCA, BF115A2 LA, BF115A2 LCA, BF115A2 XA, BF115A2 XCA, BF115A3 LA, BF115A3 LCA, BF115A3 XA, BF115A3 XCA, BF115A4 LA, BF115A4 LCA, BF115A4 XA, BF115A4 XCA, BF115A5 LA, BF115A5 LCA, BF115A5 XA, BF115A5 XCA,
24614-ZW1-700
24614-ZW1-700 LEVER, SHIFT (Honda Code 4898490).
BF75A1 LHTA, BF75A2 LHTA, BF75A3 LHTA, BF75A4 LHTA, BF75A5 LHTA, BF75A6 LHTA, BF75AT LHTA, BF75AW LHTA, BF75AX LHTA, BF75AY LHTA, BF90A1 JHTA, BF90A1 LHTA, BF90A2 JHTA, BF90A2 LHTA, BF90A3 JHTA, BF90A3 LHTA, BF90A4 JHTA, BF90A4 LHTA, BF90A5 JHTA, BF9
31250-ZW1-004
31250-ZW1-004 LEVER SET (Honda Code 5300389).
BF115A1 LA, BF115A1 LCA, BF115A1 XA, BF115A1 XCA, BF115A2 LA, BF115A2 LCA, BF115A2 XA, BF115A2 XCA, BF115A3 LA, BF115A3 LCA, BF115A3 XA, BF115A3 XCA, BF115A4 LA, BF115A4 LCA, BF115A4 XA, BF115A4 XCA, BF115A5 LA, BF115A5 LCA, BF115A5 XA, BF115A5 XCA,
24812-ZW1-V21
24812-ZW1-V21 LEVER, HANDLE LOCK (Honda Code 4898631).
BF115A1 LA, BF115A1 LCA, BF115A1 XA, BF115A1 XCA, BF115A2 LA, BF115A2 LCA, BF115A2 XA, BF115A2 XCA, BF115A3 LA, BF115A3 LCA, BF115A3 XA, BF115A3 XCA, BF115A4 LA, BF115A4 LCA, BF115A4 XA, BF115A4 XCA, BF115A5 LA, BF115A5 LCA, BF115A5 XA, BF115A5 XCA,