90203-ZW9-801 NUT, LOCK (6MM) (Honda Code 6644140). Honda
BF8D1 LHSA, BF8D1 LRA, BF8D1 SHSA, BF8D1 SRA, BF8D2 LHSA, BF8D2 LRA, BF8D2 SHSA, BF8D2 SRA, BF8D3 LHSA, BF8D3 LRA, BF8D3 SHSA, BF8D3 SRA, BF8D4 LHA, BF8D4 LHSA, BF8D4 LRA, BF8D4 SHA, BF8D4 SHSA, BF9.9D1 LHSA, BF9.9D1 LRA, BF9.9D1 SHSA, BF9.9D1 SRA, B
NUT
 (Honda Code 6644140). Honda parts")
Price: query
Rating:
Number on catalog scheme: 30
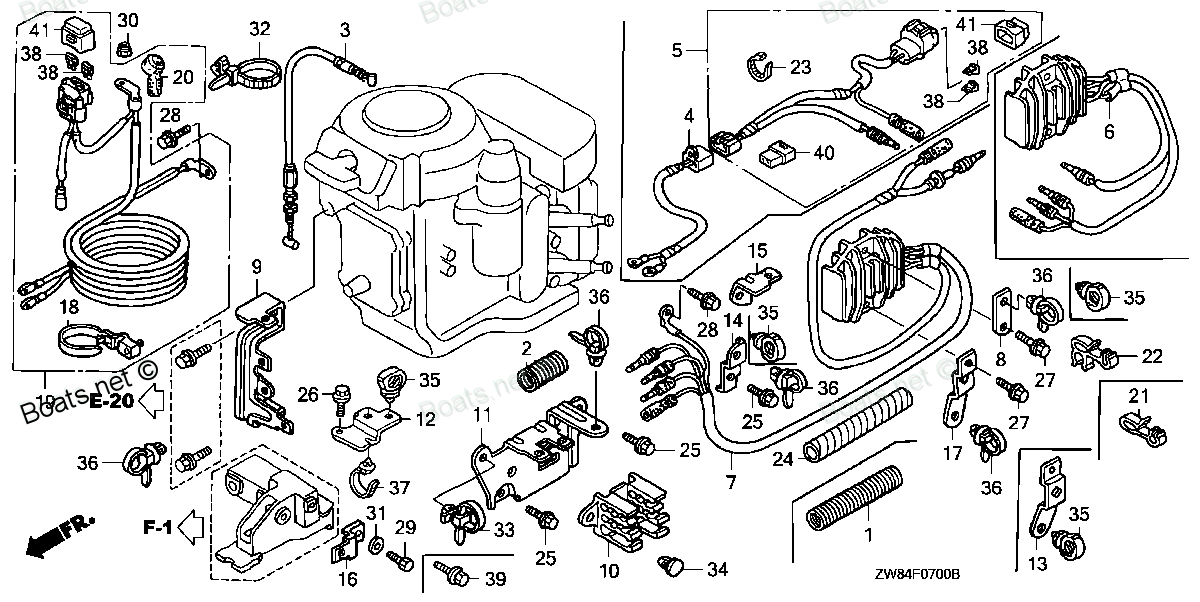
Compatible models:
BF8D1 LHSA
BF8D1 LRA
BF8D1 SHSA
BF8D1 SRA
BF8D2 LHSA
BF8D2 LRA
BF8D2 SHSA
BF8D2 SRA
BF8D3 LHSA
BF8D3 LRA
BF8D3 SHSA
BF8D3 SRA
BF8D4 LHA
BF8D4 LHSA
BF8D4 LRA
BF8D4 SHA
BF8D4 SHSA
BF9.9D1 LHSA
BF9.9D1 LRA
BF9.9D1 SHSA
BF9.9D1 SRA
BF9.9D2 LHSA
BF9.9D2 LRA
BF9.9D2 SHSA
BF9.9D2 SRA
BF9.9D3 LHSA
BF9.9D3 LRA
BF9.9D3 SHSA
BF9.9D3 SRA
BF9.9D4 LHA
BF9.9D4 LHSA
BF9.9D4 LRA
BF9.9D4 SHA
BF9.9D4 SHSA
BFP8D1 LHSA
BFP8D1 LRA
BFP8D1 XHSA
BFP8D1 XRA
BFP8D2 LHSA
BFP8D2 LRA
BFP8D2 XHSA
BFP8D2 XRA
BFP8D3 LHA
BFP8D3 LHSA
BFP8D3 LRA
BFP8D3 XHA
BFP8D3 XHSA
BFP8D3 XRA
BFP8D4 LHA
BFP8D4 XHA
BFP8D4 XHSA
BFP9.9D1 LHSA
BFP9.9D1 LRA
BFP9.9D1 XHSA
BFP9.9D1 XRA
BFP9.9D2 LHSA
BFP9.9D2 LRA
BFP9.9D2 XHSA
BFP9.9D2 XRA
BFP9.9D3 LHA
BFP9.9D3 LHSA
BFP9.9D3 LRA
BFP9.9D3 XHA
BFP9.9D3 XHSA
BFP9.9D3 XRA
BFP9.9D4 LHA
BFP9.9D4 LRA
BFP9.9D4 XHA
BFP9.9D4 XHSA
Honda
Honda entire parts catalog list:
- REGULATOR STARTER CABLE » 90203-ZW9-801
- STARTER MOTOR » 90203-ZW9-801
- STARTER MOTOR » 90203-ZW9-801
- REGULATOR STARTER CABLE » 90203-ZW9-801
- STARTER MOTOR » 90203-ZW9-801
- STARTER MOTOR » 90203-ZW9-801
- REGULATOR STARTER CABLE » 90203-ZW9-801
- STARTER MOTOR » 90203-ZW9-801
- STARTER MOTOR » 90203-ZW9-801
- REGULATOR STARTER CABLE » 90203-ZW9-801
- STARTER MOTOR » 90203-ZW9-801
- STARTER MOTOR » 90203-ZW9-801
- REGULATOR STARTER CABLE » 90203-ZW9-801
- STARTER MOTOR » 90203-ZW9-801
- STARTER MOTOR » 90203-ZW9-801
- REGULATOR STARTER CABLE » 90203-ZW9-801
- STARTER MOTOR » 90203-ZW9-801
- STARTER MOTOR » 90203-ZW9-801
- REGULATOR STARTER CABLE » 90203-ZW9-801
- STARTER MOTOR » 90203-ZW9-801
- STARTER MOTOR » 90203-ZW9-801
- REGULATOR STARTER CABLE » 90203-ZW9-801
- STARTER MOTOR » 90203-ZW9-801
- STARTER MOTOR » 90203-ZW9-801
- REGULATOR STARTER CABLE (1) » 90203-ZW9-801
- STARTER MOTOR » 90203-ZW9-801
- STARTER MOTOR » 90203-ZW9-801
- REGULATOR STARTER CABLE (1) » 90203-ZW9-801
- STARTER MOTOR » 90203-ZW9-801
- STARTER MOTOR » 90203-ZW9-801
- REGULATOR STARTER CABLE (1) » 90203-ZW9-801
- STARTER MOTOR » 90203-ZW9-801
- STARTER MOTOR » 90203-ZW9-801
- REGULATOR STARTER CABLE (1) » 90203-ZW9-801
- STARTER MOTOR » 90203-ZW9-801
- STARTER MOTOR » 90203-ZW9-801
- REGULATOR STARTER CABLE (1) » 90203-ZW9-801
- STARTER MOTOR » 90203-ZW9-801
- STARTER MOTOR » 90203-ZW9-801
- STARTER MOTOR » 90203-ZW9-801
- REGULATOR STARTER CABLE (1) » 90203-ZW9-801
- STARTER MOTOR » 90203-ZW9-801
- REGULATOR STARTER CABLE (1) » 90203-ZW9-801
- STARTER MOTOR » 90203-ZW9-801
- STARTER MOTOR » 90203-ZW9-801
- STARTER MOTOR » 90203-ZW9-801
- STARTER MOTOR » 90203-ZW9-801
- REGULATOR STARTER CABLE » 90203-ZW9-801
- STARTER MOTOR » 90203-ZW9-801
- STARTER MOTOR » 90203-ZW9-801
- REGULATOR STARTER CABLE » 90203-ZW9-801
- STARTER MOTOR » 90203-ZW9-801
- STARTER MOTOR » 90203-ZW9-801
- REGULATOR STARTER CABLE » 90203-ZW9-801
- STARTER MOTOR » 90203-ZW9-801
- REGULATOR STARTER CABLE » 90203-ZW9-801
- STARTER MOTOR » 90203-ZW9-801
- STARTER MOTOR » 90203-ZW9-801
- STARTER MOTOR » 90203-ZW9-801
- REGULATOR STARTER CABLE » 90203-ZW9-801
- STARTER MOTOR » 90203-ZW9-801
- STARTER MOTOR » 90203-ZW9-801
- REGULATOR STARTER CABLE » 90203-ZW9-801
- STARTER MOTOR » 90203-ZW9-801
- STARTER MOTOR » 90203-ZW9-801
- REGULATOR STARTER CABLE » 90203-ZW9-801
- STARTER MOTOR » 90203-ZW9-801
- REGULATOR STARTER CABLE » 90203-ZW9-801
- STARTER MOTOR » 90203-ZW9-801
- STARTER MOTOR » 90203-ZW9-801
- REGULATOR STARTER CABLE (1) » 90203-ZW9-801
- STARTER MOTOR » 90203-ZW9-801
- STARTER MOTOR » 90203-ZW9-801
- REGULATOR STARTER CABLE (1) » 90203-ZW9-801
- STARTER MOTOR » 90203-ZW9-801
- REGULATOR STARTER CABLE (1) » 90203-ZW9-801
- STARTER MOTOR » 90203-ZW9-801
- STARTER MOTOR » 90203-ZW9-801
- REGULATOR STARTER CABLE (1) » 90203-ZW9-801
- STARTER MOTOR » 90203-ZW9-801
- STARTER MOTOR » 90203-ZW9-801
- REGULATOR STARTER CABLE (1) » 90203-ZW9-801
- STARTER MOTOR » 90203-ZW9-801
- STARTER MOTOR » 90203-ZW9-801
- STARTER MOTOR » 90203-ZW9-801
- REGULATOR STARTER CABLE (1) » 90203-ZW9-801
- STARTER MOTOR » 90203-ZW9-801
- REGULATOR STARTER CABLE (1) » 90203-ZW9-801
- STARTER MOTOR » 90203-ZW9-801
- STARTER MOTOR » 90203-ZW9-801
- REGULATOR STARTER CABLE » 90203-ZW9-801
- STARTER MOTOR » 90203-ZW9-801
- STARTER MOTOR » 90203-ZW9-801
- REGULATOR STARTER CABLE » 90203-ZW9-801
- STARTER MOTOR » 90203-ZW9-801
- STARTER MOTOR » 90203-ZW9-801
- STARTER MOTOR » 90203-ZW9-801
- STARTER MOTOR » 90203-ZW9-801
- REGULATOR STARTER CABLE » 90203-ZW9-801
- STARTER MOTOR » 90203-ZW9-801
- STARTER MOTOR » 90203-ZW9-801
- REGULATOR STARTER CABLE » 90203-ZW9-801
- REGULATOR STARTER CABLE » 90203-ZW9-801
- STARTER MOTOR » 90203-ZW9-801
- STARTER MOTOR » 90203-ZW9-801
- REGULATOR STARTER CABLE » 90203-ZW9-801
- STARTER MOTOR » 90203-ZW9-801
- STARTER MOTOR » 90203-ZW9-801
- STARTER MOTOR » 90203-ZW9-801
- STARTER MOTOR » 90203-ZW9-801
- REGULATOR STARTER CABLE » 90203-ZW9-801
- STARTER MOTOR » 90203-ZW9-801
- STARTER MOTOR » 90203-ZW9-801
- REGULATOR STARTER CABLE » 90203-ZW9-801
- REGULATOR STARTER CABLE (1) » 90203-ZW9-801
Information:
Probable Causes
Air shutoff (if equipped)
Connectors and wiring
Fuel system
Switches
Circuit protection
Speed/timing sensorsRecommended Actions
Table 1
Troubleshooting Test Steps Values Results
1. Inspect the Electrical Connectors and the Wiring
A. Turn the main disconnect switch to the OFF position.
B. Check for the correct installation of the ECM J1/P1 and the J2/P2 connectors. Refer to Troubleshooting, "Electrical Power Supply - Test" for additional information.
C. Check for correct installation of the fuel injector connectors.
D. Check the power and ground connections to the ECM. Refer to Troubleshooting, "Electrical Power Supply - Test" for additional information.
Connectors and Wiring
Result: The connectors and wiring appear to be OK.
Proceed to Test Step 2.
Result: There is a problem with the connectors and/or wiring.
Repair: Repair or replace the connectors or wiring. Perform the following procedure:
1. Connect Cat® Electronic Technician (ET) to the service tool connector.
2. Use Cat ET to perform the following test:
- "Wiggle Test"
If the problem is not resolved, proceed to Test Step 2.
2. Inspect the Fuel System
Refer to Testing and Adjusting, "Fuel System Inspection" for additional information.
A. Visually check the fuel level in the fuel tank. Do not rely on the fuel gauge only.
B. Ensure that the vent in the fuel cap is not filled with debris.
C. Ensure that the fuel supply valve (if equipped) is in the full OPEN position.
Note: Cold weather adversely affects the characteristics of the fuel. Refer to the engines Operation and Maintenance Manual for information on improving the characteristics of the fuel during cold-weather operation.
D. Check fuel quality. Refer to Testing and Adjusting, "Fuel Quality - Test" for additional information. Check the fuel tank for debris or foreign objects which may block the fuel supply.
E. Check for fuel leaks.
F. Check the filtered fuel pressure while the engine is being cranked. Refer to Troubleshooting, "Fuel Pressure Is Low" for additional information.
Fuel System
Result: The fuel system is OK.
Proceed to Test Step 3.
Result: The fuel system is NOT OK.
Repair: Repair or replace damaged fuel system components.
If the problem is not resolved, proceed to Test Step 3.
3. Inspect the Switches
A. Check the keyswitch input to the ECM.
B. Check engine shutdown switches.
C. Connect Cat ET.
D. Use Cat ET to verify the status of the following parameters:
- Shutdown switches
Switches
Result: The switches are OK.
Proceed to Test Step 4.
Result: A switch is NOT OK.
Repair: Repair or replace damaged switch.
If the problem is not resolved, proceed to Test Step 4.
4. Check the Device for Circuit Protection
A. Inspect the wires and connectors to all circuit protection for the engine.
Circuit Protection
Result: The circuit protection device is not tripped.
Proceed to Test Step 5.
Result: The circuit protection device is tripped.
Repair: Reset the circuit breakers if the circuit breakers are tripped. If necessary, replace fuses (if equipped). Prior to returning the engine to service, determine the condition that caused the circuit breaker to trip. Make the necessary repairs.
If the problem is not resolved, proceed to Test Step 5.
5. Check the Engine Speed/Timing Sensors
A. Thoroughly inspect the connectors for the engine speed/timing sensors.
B. Crank the engine. If the engine starts and no speed timing codes are logged, the speed timing circuit is operating correctly.
Speed/Timing Sensors
Result: The speed/timing sensors or wiring are NOT OK.
Repair: Repair or replace speed/timing sensors or wiring. Refer to Troubleshooting, "Speed/Timing - Test" for additional information.
Verify that the repair eliminated the problem.
If the procedure did not correct the issue, contact your Cat dealer Technical Communicator (TC). For further assistance, your TC can confer with the Dealer Solutions Network (DSN).
Parts nut Honda:
90302-921-000

90302-921-000 NUT, HEX. (16MM) (Honda Code 0285049).
BF115A1 LA, BF115A1 LCA, BF115A1 XA, BF115A1 XCA, BF115A2 LA, BF115A2 LCA, BF115A2 XA, BF115A2 XCA, BF115A3 LA, BF115A3 LCA, BF115A3 XA, BF115A3 XCA, BF115A4 LA, BF115A4 LCA, BF115A4 XA, BF115A4 XCA, BF115A5 LA, BF115A5 LCA, BF115A5 XA, BF115A5 XCA,
90305-ZV4-000

90305-ZV4-000 NUT, SELF-LOCK (8MM) (Honda Code 2800530).
BF15A1 LA, BF15A1 LAS, BF15A1 SA, BF15A1 SAS, BF15A1 XAS, BF15A2 LA, BF15A2 LAS, BF15A2 SA, BF15A2 SAS, BF15A2 XAS, BF15AM LA, BF15AM LAS, BF15AM SA, BF15AM SAS, BF15AM XAS, BF15AW LA, BF15AW LAS, BF15AW SA, BF15AW SAS, BF15AW XAS, BF15AX LA, BF15AX
90206-001-000

90206-001-000 NUT, TAPPET ADJ. (Honda Code 0004598).
BF15A1 LA, BF15A1 LAS, BF15A1 SA, BF15A1 SAS, BF15A1 XAS, BF15A2 LA, BF15A2 LAS, BF15A2 SA, BF15A2 SAS, BF15A2 XAS, BF15AM LA, BF15AM LAS, BF15AM SA, BF15AM SAS, BF15AM XAS, BF15AW LA, BF15AW LAS, BF15AW SA, BF15AW SAS, BF15AW XAS, BF15AX LA, BF15AX
90302-ZV4-000

90302-ZV4-000 NUT, SELF-LOCK (5MM) (Honda Code 2800506).
BF115A1 LA, BF115A1 LCA, BF115A1 XA, BF115A1 XCA, BF115A2 LA, BF115A2 LCA, BF115A2 XA, BF115A2 XCA, BF115A3 LA, BF115A3 LCA, BF115A3 XA, BF115A3 XCA, BF115A4 LA, BF115A4 LCA, BF115A4 XA, BF115A4 XCA, BF115A5 LA, BF115A5 LCA, BF115A5 XA, BF115A5 XCA,
90205-PP9-020
90205-PP9-020 NUT, SELF-LOCK (6MM) (Honda Code 3781069).
BF115A1 LA, BF115A1 LCA, BF115A1 XA, BF115A1 XCA, BF115A2 LA, BF115A2 LCA, BF115A2 XA, BF115A2 XCA, BF115A3 LA, BF115A3 LCA, BF115A3 XA, BF115A3 XCA, BF115A4 LA, BF115A4 LCA, BF115A4 XA, BF115A4 XCA, BF115A5 LA, BF115A5 LCA, BF115A5 XA, BF115A5 XCA,
90302-ZV5-000
90302-ZV5-000 NUT (3/8-24 UNF) (Honda Code 3706009).
BF15D3 LRA, BF15D3 LRTA, BF15D3 SHA, BF15D3 SHSA, BF15D3 SRTA, BF15D4 LRA, BF15D4 LRTA, BF15D4 SRTA, BF15D5 LGA, BF15D5 LHA, BF15D5 LHGA, BF15D5 LHSA, BF15D5 LHTA, BF15D5 LRA, BF15D5 LRTA, BF15D5 SRTA, BF15D5 XHA, BF15D5 XHGA, BF15D6 LHA, BF15D6 LHSA
90307-ZV5-003
90307-ZV5-003 NUT, SELF-LOCK (3/8-24UNF) (Honda Code 3706066).
BF115A1 LA, BF115A1 LCA, BF115A1 XA, BF115A1 XCA, BF115A2 LA, BF115A2 LCA, BF115A2 XA, BF115A2 XCA, BF115A3 LA, BF115A3 LCA, BF115A3 XA, BF115A3 XCA, BF115A4 LA, BF115A4 LCA, BF115A4 XA, BF115A4 XCA, BF115A5 LA, BF115A5 LCA, BF115A5 XA, BF115A5 XCA,
90202-ZW9-000
90202-ZW9-000 NUT, SPECIAL (14MM) (Honda Code 6644132).
BF8D1 LHA, BF8D1 LHSA, BF8D1 LRA, BF8D1 SA, BF8D1 SHA, BF8D1 SHSA, BF8D1 SRA, BF8D2 LHA, BF8D2 LHSA, BF8D2 LRA, BF8D2 SA, BF8D2 SHA, BF8D2 SHSA, BF8D2 SRA, BF8D3 LHA, BF8D3 LHSA, BF8D3 LRA, BF8D3 SA, BF8D3 SHA, BF8D3 SHSA, BF8D3 SRA, BF8D4 LHA, BF8D4