06310-ZV1-A00 RECEPTACLE KIT, CHARGE (Honda Code 3749025). Honda
BF5A1 LA, BF5A1 SA, BF5A2 LA, BF5A2 SA, BF5A3 LA, BF5A3 SA, BF5AK2 LA, BF5AK2 SA, BF5AM LA, BF5AM SA, BF5AW LA, BF5AW SA, BF5AX LA, BF5AX SA, BF5AY LA, BF5AY SA
RECEPTACLE
. Honda parts")
Price: query
Rating:
Number on catalog scheme: 1
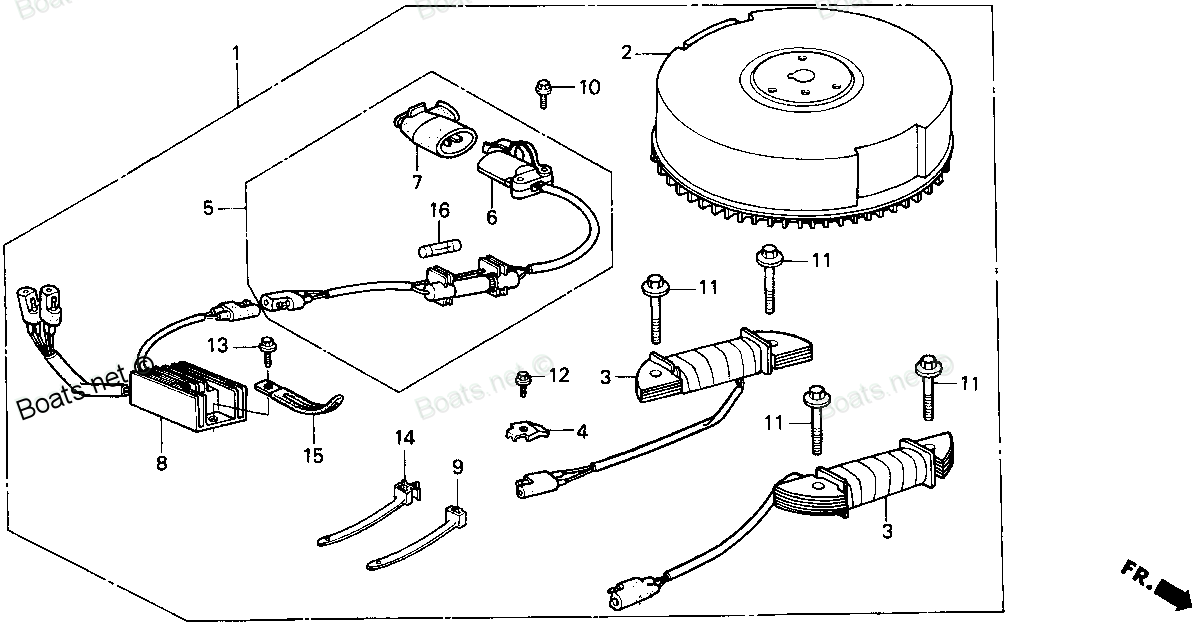
Compatible models:
Honda entire parts catalog list:
- CHARGE RECEPTACLE KIT » 06310-ZV1-A00
- CHARGE RECEPTACLE KIT » 06310-ZV1-A00
- CHARGE RECEPTACLE KIT » 06310-ZV1-A00
- CHARGE RECEPTACLE KIT » 06310-ZV1-A00
- CHARGE RECEPTACLE KIT » 06310-ZV1-A00
- CHARGE RECEPTACLE KIT » 06310-ZV1-A00
- CHARGE RECEPTACLE KIT » 06310-ZV1-A00
- CHARGE RECEPTACLE KIT » 06310-ZV1-A00
- CHARGE RECEPTACLE KIT » 06310-ZV1-A00
- CHARGE RECEPTACLE KIT » 06310-ZV1-A00
- CHARGE RECEPTACLE KIT » 06310-ZV1-A00
- CHARGE RECEPTACLE KIT » 06310-ZV1-A00
- CHARGE RECEPTACLE KIT » 06310-ZV1-A00
- CHARGE RECEPTACLE KIT » 06310-ZV1-A00
- CHARGE RECEPTACLE KIT » 06310-ZV1-A00
- CHARGE RECEPTACLE KIT » 06310-ZV1-A00
Information:
Table 1
Diagnostic Trouble Codes
J1939 Code and Description CDL Code and Description Comments
100-17
Engine Oil Pressure : Low - least severe (1) E360 (1)
Low Engine Oil Pressure Oil pressure is below the specified pressure for at least 8 seconds. A snapshot is triggered. The code is logged. Engine performance is not affected.
100-18
Engine Oil Pressure : Low - moderate severity (2) E360 (2)
Low Engine Oil Pressure Oil pressure is lower than the specified pressure for at least 4 seconds. Engine power is reduced. A snapshot is triggered. The code is logged. Factory passwords are required.
After 30 seconds, the Engine Control Module (ECM) will shut down the engine if the "Engine Monitoring Mode" parameter is programmed to "Shut down".
Note: Not all machine or engine software contain the shutdown feature in Cat® Electronic Technician (ET). If this feature is not available, the engine will derate 100%, but stay running.
100-1
Engine Oil Pressure : Low - most severe (3) E360 (3)
Low Engine Oil Pressure Oil pressure is lower than the specified pressure for at least 4 seconds. Engine power is reduced. A snapshot is triggered. The code is logged. Factory passwords are required.
After 30 seconds, the ECM will shut down the engine if the "Engine Monitoring Mode" parameter is programmed to "Shut down".
Note: Not all machine or engine software contain the shutdown feature in Cat ET. If this feature is not available, the engine will derate 100%, but stay running. Probable Causes
Low engine oil level
Aeration in the oil
Low oil viscosity
Plugged Oil Filter
Faulty oil pump
Faulty engine oil pressure sensor
Faulty bypass valve
Damaged suction tube or cracked suction tube
Excessive wear of engine componentsRecommended Actions
Table 2
Troubleshooting Test Steps Values Results
1. Engine Oil Level
A. Check the engine oil level in the crankcase. Refer to the Operation and Maintenance Manual for calibration of the dipstick gauge. The oil level can possibly be too far below the oil pump supply tube. The oil pump cannot supply enough lubrication to the engine components.
Oil
Result: The engine oil level is low.
Repair: Add engine oil in order to obtain the correct engine oil level. Refer to Operation and Maintenance Manual, "Engine Oil" for the recommendations of engine oil.
Start the engine. Inspect the exterior of the engine for oil leaks. Repair any oil leaks.
Result: The engine oil is not low.
Proceed to Test Step 2.
2. Aerated Oil
A. Sample the engine oil for aeration.
Foamy oil on the dipstick is a good indication of aeration.
Aeration
Result: The oil is aerated.
Proceed to Test Step 8.
Result: The oil is not aerated.
Proceed to Test Step 3.
3. Oil Viscosity
A. Sample the engine oil viscosity. Obtain an S O S Oil Analysis to determine the characteristics of the oil.
Oil Viscosity
Result: The oil viscosity is not correct.
Repair: Replace the engine oil.
Refer to Operation and Maintenance Manual, "Engine Oil" for the recommendations of engine oil. If the symptom is corrected, return the unit to service. If the symptom still exists, proceed to Test Step 4.
Result: The oil viscosity is correct.
Proceed to Test Step 4.
4. Oil Filter
A. Replace the engine oil filter.
Filter
Result: The oil filter was changed.
If the symptom is corrected, return the unit to service.
If the symptom still exists, proceed to Test Step 5.
5. Oil Pump
A. Manually check the engine oil pressure. Refer to Systems Operation/Testing and Adjusting, "Engine Oil Pressure - Test" for the correct procedure.
Oil Pressure
Result: The oil pressure is meets specifications.
Proceed to Test Step 6.
Result: The oil pressure does not meet specifications.
Repair: Replace the oil pump. If the symptom is corrected, return the unit to service.
If the symptom still exists, proceed to Test Step 6.
Illustration 1 g06019289
(1) Engine oil pressure sensor
Illustration 2 g06019290
(2) T fitting
Table 3
Troubleshooting Test Steps Values Results
6. Engine Oil Pressure Sensor
A. Remove the connector and the oil pressure sensor.
B. Install an appropriate "T" fitting in the pressure sensor port.
C. Install a manual gauge on one side of the "T" fitting. Install the oil pressure sensor on the other side of the pipe "T" fitting.
D. Start the engine and compare the oil pressure between the manual gauge and Cat ET. The pressure reading must be within 34 kPa ( 5 psi).
Sensor
Result The pressure is within 34 kPa ( 5 psi).
Proceed to Test Step 7.
Result The pressure is not within 34 kPa ( 5 psi).
Repair: Replace the sensor. If the symptom is corrected, return the unit to service.
If the symptom still exists, proceed to Test Step 7.
7. Engine Oil Filter Bypass
A. Replace the oil filter base.
Filter Base
Result: The oil filter base was replaced.
If the symptom is corrected, return the unit to service.
If the symptom still exists, proceed to Test Step 8.
8. Oil Pump Suction Tube
A. Remove the oil pan.
B. Inspect the suction tube. Check the joints of the tube for cracks or for a damaged O-ring seal at the connection to the pump.
C. Inspect the inlet screen of the suction tube for a restriction. This restriction will cause cavitation and a loss of engine oil pressure.
Suction Tube
Result: The suction tube and seal are OK.
Proceed to Test Step 9.
Result: The suction tube and seal are not OK.
Repair: Replace any damaged parts.
9. Worn Engine Components
A. Remove the valve covers.
B. Inspect the camshaft and bearings.
C.
Parts receptacle Honda:
31650-ZV1-A01
31650-ZV1-A01 RECEPTACLE ASSY., CHARGE (Honda Code 3749207).
BF5A1 LA, BF5A1 SA, BF5A2 LA, BF5A2 SA, BF5A3 LA, BF5A3 SA, BF5AK2 LA, BF5AK2 SA, BF5AM LA, BF5AM SA, BF5AW LA, BF5AW SA, BF5AX LA, BF5AX SA, BF5AY LA, BF5AY SA
31651-ZV1-A01

31651-ZV1-A01 RECEPTACLE (Honda Code 5711650).
BF5A1 LA, BF5A1 SA, BF5A2 LA, BF5A2 SA, BF5A3 LA, BF5A3 SA, BF5A4 LA, BF5A4 SA, BF5A5 LA, BF5A5 SA, BF5A6 LA, BF5A6 SA, BF5AK0 LA, BF5AK0 SA, BF5AK2 LA, BF5AK2 SA, BF5AK3 LA, BF5AK3 SA, BF5AM LA, BF5AM SA, BF5AW LA, BF5AW SA, BF5AX LA, BF5AX SA, BF5A
31650-ZV1-A02
31650-ZV1-A02 RECEPTACLE ASSY., CHARGE (Honda Code 7531627).
BF5A1 LA, BF5A1 SA, BF5A2 LA, BF5A2 SA, BF5A3 LA, BF5A3 SA, BF5A4 LA, BF5A4 SA, BF5A5 LA, BF5A5 SA, BF5A6 LA, BF5A6 SA, BF5AK0 LA, BF5AK0 SA, BF5AK2 LA, BF5AK2 SA, BF5AK3 LA, BF5AK3 SA
06310-ZV1-F01ZA
06310-ZV1-F01ZA RECEPTACLE KIT, CHARGE *TBLACK* (BLACK)
BF5A2 LA, BF5A2 SA, BF5A3 LA, BF5A3 SA, BF5A4 LA, BF5A4 SA, BF5A5 LA, BF5A5 SA, BF5A6 LA, BF5A6 SA, BF5AK0 LA, BF5AK0 SA, BF5AK2 LA, BF5AK2 SA, BF5AK3 LA, BF5AK3 SA