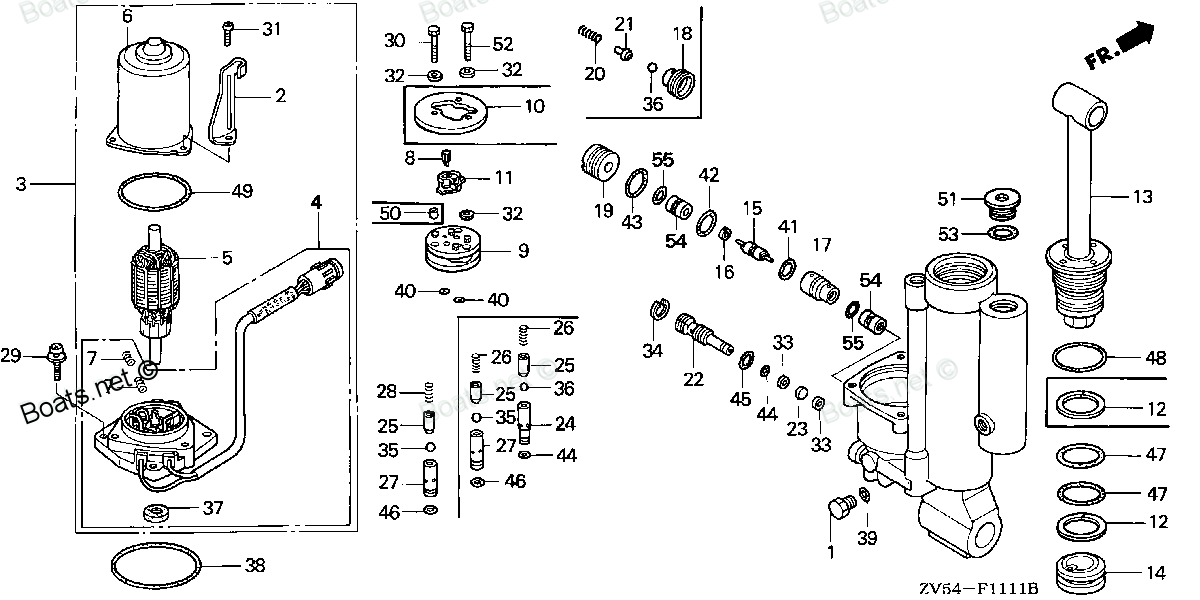
90134-ZV5-820 SCREW, PAN (5X16) (Honda Code 4594727). Honda
BF35AM LRTA, BF35AM XRTA, BF40A1 LHTA, BF40A1 LRTA, BF40A1 XRTA, BF40A2 LHTA, BF40A2 LRTA, BF40A2 XRTA, BF40AW LHTA, BF40AW LRTA, BF40AW XRTA, BF40AX LHTA, BF40AX LRTA, BF40AX XRTA, BF40AY LHTA, BF40AY LRTA, BF40AY XRTA, BF45AM LRTA, BF45AM SRTA, BF4
SCREW
 (Honda Code 4594727). Honda parts")
Price: query
Rating:
Number on catalog scheme: 31
Compatible models:
BF35AM LRTA
BF35AM XRTA
BF40A1 LHTA
BF40A1 LRTA
BF40A1 XRTA
BF40A2 LHTA
BF40A2 LRTA
BF40A2 XRTA
BF40AW LHTA
BF40AW LRTA
BF40AW XRTA
BF40AX LHTA
BF40AX LRTA
BF40AX XRTA
BF40AY LHTA
BF40AY LRTA
BF40AY XRTA
BF45AM LRTA
BF45AM SRTA
BF45AM XRTA
BF50A1 LHTA
BF50A1 LRTA
BF50A1 XRTA
BF50A2 LHTA
BF50A2 LRTA
BF50A2 XRTA
BF50AW LHTA
BF50AW LRTA
BF50AW XRTA
BF50AX LHTA
BF50AX LRTA
BF50AX XRTA
BF50AY LHTA
BF50AY LRTA
BF50AY XRTA
Honda
Honda entire parts catalog list:
- POWER TILT COMPONENTS » 90134-ZV5-820
- POWER TILT COMPONENTS » 90134-ZV5-820
- POWER TRIM-TILT » 90134-ZV5-820
- POWER TRIM-TILT » 90134-ZV5-820
- POWER TRIM-TILT » 90134-ZV5-820
- POWER TRIM-TILT » 90134-ZV5-820
- POWER TRIM-TILT » 90134-ZV5-820
- POWER TRIM-TILT » 90134-ZV5-820
- POWER TILT COMPONENTS » 90134-ZV5-820
- POWER TILT COMPONENTS » 90134-ZV5-820
- POWER TILT COMPONENTS » 90134-ZV5-820
- POWER TILT COMPONENTS » 90134-ZV5-820
- POWER TILT COMPONENTS » 90134-ZV5-820
- POWER TILT COMPONENTS » 90134-ZV5-820
- POWER TRIM-TILT » 90134-ZV5-820
- POWER TRIM-TILT » 90134-ZV5-820
- POWER TRIM-TILT » 90134-ZV5-820
- POWER TILT COMPONENTS » 90134-ZV5-820
- POWER TILT COMPONENTS » 90134-ZV5-820
- POWER TILT COMPONENTS » 90134-ZV5-820
- POWER TRIM-TILT » 90134-ZV5-820
- POWER TRIM-TILT » 90134-ZV5-820
- POWER TRIM-TILT » 90134-ZV5-820
- POWER TRIM-TILT » 90134-ZV5-820
- POWER TRIM-TILT » 90134-ZV5-820
- POWER TRIM-TILT » 90134-ZV5-820
- POWER TILT COMPONENTS » 90134-ZV5-820
- POWER TILT COMPONENTS » 90134-ZV5-820
- POWER TILT COMPONENTS » 90134-ZV5-820
- POWER TILT COMPONENTS » 90134-ZV5-820
- POWER TILT COMPONENTS » 90134-ZV5-820
- POWER TILT COMPONENTS » 90134-ZV5-820
- POWER TRIM-TILT » 90134-ZV5-820
- POWER TRIM-TILT » 90134-ZV5-820
- POWER TRIM-TILT » 90134-ZV5-820
Information:
Table 1
Required Tools
Tool Part Number Part Description Qty
A 298-5564 T40 Torx Socket 1
D 1U-5718 Vacuum Pump 1
169-7372 Fluid Sampling Bottle 1
4C-4057 Tube
7.9 mm (0.31 inch) Outside Diameter 1
E 276-1216 Crows Foot Wrench 1
F 247-5377 Torque Wrench 1
Ensure that all adjustments and repairs that are carried out to the fuel system are performed by authorised personnel that have the correct training.Before begining ANY work on the fuel system, refer to Operation and Maintenance Manual, "General Hazard Information and High Pressure Fuel Lines" for safety information.Refer to Systems Operation, Testing and Adjusting Manual, "Cleanliness of Fuel System Components" for detailed information on the standards of cleanliness that must be observed during ALL work on the fuel system.
Care must be taken to ensure that fluids are contained during performance of inspection, maintenance, testing, adjusting and repair of the product. Be prepared to collect the fluid with suitable containers before opening any compartment or disassembling any component containing fluids.Dispose of all fluids according to local regulations and mandates.
Use a deep socket in order to install the electrical connections to the electronic unit injectors. Use of incorrect tooling will result in damage to the electronic unit injectors.
Illustration 1 g02353356
Injector code
If the original electronic unit injector (8) is installed , ensure that the electronic unit injector is installed into the original position.
If a replacement electronic unit injector is installed, the correct injector code must be programmed into the electronic control module. Refer to Troubleshooting, "Injector Code - Calibrate" for more information. The code that is required is located at Position (X) .Note: Record Code (X) before the electronic unit injector is installed.
Use Tooling (D) in order to remove any fuel from the cylinder.Note: Evacuate as much fuel as possible from the cylinder before installing the electronic unit injector.
Illustration 2 g02313273
If necessary, follow Step 4.a through Step 4.e in order to install a new harness assembly (6) to cylinder head (16) .
Install a new harness assembly (6) to cylinder head (16) .Note: Do not lubricate the O-ring seal.
Install a new bolt (14) to harness assembly (6) . Tighten the bolt to a torque of 5.5 N m (49 lb in).
Install new assemblies of cable strap (13) for harness assembly (6) to cylinder head (16) .Note: Ensure that the assemblies of the cable strap are correctly installed into the cylinder head.
Connect harness assembly (15) to harness assembly (6) .
If necessary, repeat Step 4.a through Step 4.e in order to install the remaining harness assemblies to the cylinder head.
Ensure that the fuel inlet port of the electronic unit injector is capped. Ensure that the electronic unit injector is clean.
Illustration 3 g01972153
New sealing washer (12) should only be installed if the original electronic unit injector (8) is to be reused.
On installing an original electronic unit injector, install a new O-ring seal (11) .Note: Do not lubricate the O-ring seal.
Use a suitable tool in order to install a new sealing washer (12) to electronic unit injector (8) .Note: Ensure that the nozzle for the electronic unit injector is not damaged in any way on installation of the new sealing washer.
Ensure that O-ring seal (11) and sealing washer (12) on a new electronic unit injector are not damaged and in place.Note: Do not lubricate the O-ring seal.
Ensure that the seat for the electronic unit injector in the cylinder head is clean and free from damage. Ensure that the sealing washer has been removed from the cylinder head.
Illustration 4 g01971773
Position clamp (10) onto electronic unit injector (8) . Align the assembly of electronic unit injector (8) to the bore for the electronic unit injector in the cylinder head.Note: Ensure that the clamp is correctly positioned onto the electronic unit injector.
Push only on injector clamp (10) in order to install electronic unit injector (8) . Do not apply pressure on any other part of the electronic unit injector. Ensure that the electronic unit injector is pushed firmly against the seat in the cylinder head.
Install a new Torx screw (9) to clamp (10) . Tighten the Torx screw finger tight.
Remove the cap from electronic unit injector (8) . Install a new seal (4) to electronic unit injector (8) and to the cylinder head. Ensure that the flange on the seal is flush with the cylinder head.
Remove the plugs from the new fuel injection line. Install the fuel injection line hand tight. Refer to Disassembly and Assembly, "Fuel Injection Lines - Install" for the correct procedure.Note: Ensure that the ends of the fuel injection line are seated into
Parts screw Honda:
16071-ZV4-005

16071-ZV4-005 SCREW, PLUG (Honda Code 2794956).
BF15A1 LA, BF15A1 LAS, BF15A1 SA, BF15A1 SAS, BF15A1 XAS, BF15A2 LA, BF15A2 LAS, BF15A2 SA, BF15A2 SAS, BF15A2 XAS, BF15AM LA, BF15AM LAS, BF15AM SA, BF15AM SAS, BF15AM XAS, BF15AW LA, BF15AW LAS, BF15AW SA, BF15AW SAS, BF15AW XAS, BF15AX LA, BF15AX
16081-ZV4-650
16081-ZV4-650 SCREW-WASHER (Honda Code 3507852).
BF15A1 LA, BF15A1 LAS, BF15A1 SA, BF15A1 SAS, BF15A1 XAS, BF15A2 LA, BF15A2 LAS, BF15A2 SA, BF15A2 SAS, BF15A2 XAS, BF15AM LA, BF15AM LAS, BF15AM SA, BF15AM SAS, BF15AM XAS, BF15AW LA, BF15AW LAS, BF15AW SA, BF15AW SAS, BF15AW XAS, BF15AX LA, BF15AX
16016-ZV3-000
16016-ZV3-000 SCREW SET (Honda Code 3701752).
BF35AM LHA, BF35AM LRA, BF35AM LRTA, BF35AM SHA, BF35AM XRTA, BF45AM LHA, BF45AM LRA, BF45AM LRTA, BF45AM SRTA, BF45AM XRTA, BF75AT LHTA, BF75AT LRTA, BF75AT XRTA, BF90AT LHTA, BF90AT LRTA, BF90AT XRTA
90123-ZV3-000
90123-ZV3-000 SCREW, PAN (5X12) (Honda Code 3718723).
BF25A1 LHA, BF25A1 LHSA, BF25A1 SHA, BF25A1 SHSA, BF25A2 LHA, BF25A2 LHSA, BF25A2 SHA, BF25A2 SHSA, BF25A3 LHA, BF25A3 LHSA, BF25A3 SHA, BF25A3 SHSA, BF25AW LHA, BF25AW LHSA, BF25AW SHA, BF25AW SHSA, BF25AX LHA, BF25AX LHSA, BF25AX SHA, BF25AX SHSA,
93500-06016-0B

93500-06016-0B SCREW, PAN (6X16) (Honda Code 2088714).
BF35AM LHA, BF35AM LRA, BF35AM LRTA, BF35AM SHA, BF35AM XRTA, BF40A1 LHA, BF40A1 LHTA, BF40A1 LRA, BF40A1 LRTA, BF40A1 XRTA, BF40A2 LHA, BF40A2 LHTA, BF40A2 LRA, BF40A2 LRTA, BF40A2 XRTA, BF40AW LHA, BF40AW LHTA, BF40AW LRA, BF40AW LRTA, BF40AW XRTA,
16016-ZV7-B51
16016-ZV7-B51 SCREW SET (Honda Code 5686761).
BF25A1 LHA, BF25A1 LHSA, BF25A1 LRSA, BF25A1 SHA, BF25A1 SHSA, BF25A1 SRSA, BF25A1 XRSA, BF25A2 LRSA, BF25A2 SRSA, BF25A2 XRSA, BF25AW LHA, BF25AW LHSA, BF25AW LRSA, BF25AW SHA, BF25AW SHSA, BF25AW SRSA, BF25AW XRSA, BF25AX LHA, BF25AX LHSA, BF25AX L
16016-ZW4-D21
16016-ZW4-D21 SCREW SET (Honda Code 6652119).
BF15A1 LA, BF15A1 LAS, BF15A1 SA, BF15A1 SAS, BF15A1 XAS, BF15A2 LA, BF15A2 LAS, BF15A2 SA, BF15A2 SAS, BF15A2 XAS, BF40A4 LHA, BF40A4 LHTA, BF40A4 LRTA, BF40A5 LHA, BF40A5 LHTA, BF40A5 LRTA, BF40A6 LHA, BF40A6 LHTA, BF40A6 LRTA, BF40AK0 LHA, BF40AK0
90104-ZW7-U01
90104-ZW7-U01 SCREW, TAPPING (6X30) (Honda Code 7207475).
BF115A3 LA, BF115A3 LCA, BF115A3 XA, BF115A3 XCA, BF115A4 LA, BF115A4 LCA, BF115A4 XA, BF115A4 XCA, BF115A5 LA, BF115A5 LCA, BF115A5 XA, BF115A5 XCA, BF115A6 LA, BF115A6 LCA, BF115A6 XA, BF115A6 XCA, BF115AK0 LA, BF115AK0 XA, BF115DK1 LA, BF115DK1 XA