56191-ZV5-821 SEAT B, VALVE (Honda Code 4594685). Honda
BF35AM LRTA, BF35AM XRTA, BF40AW LHTA, BF40AW LRTA, BF40AW XRTA, BF45AM LRTA, BF45AM SRTA, BF45AM XRTA, BF50AW LHTA, BF50AW LRTA, BF50AW XRTA
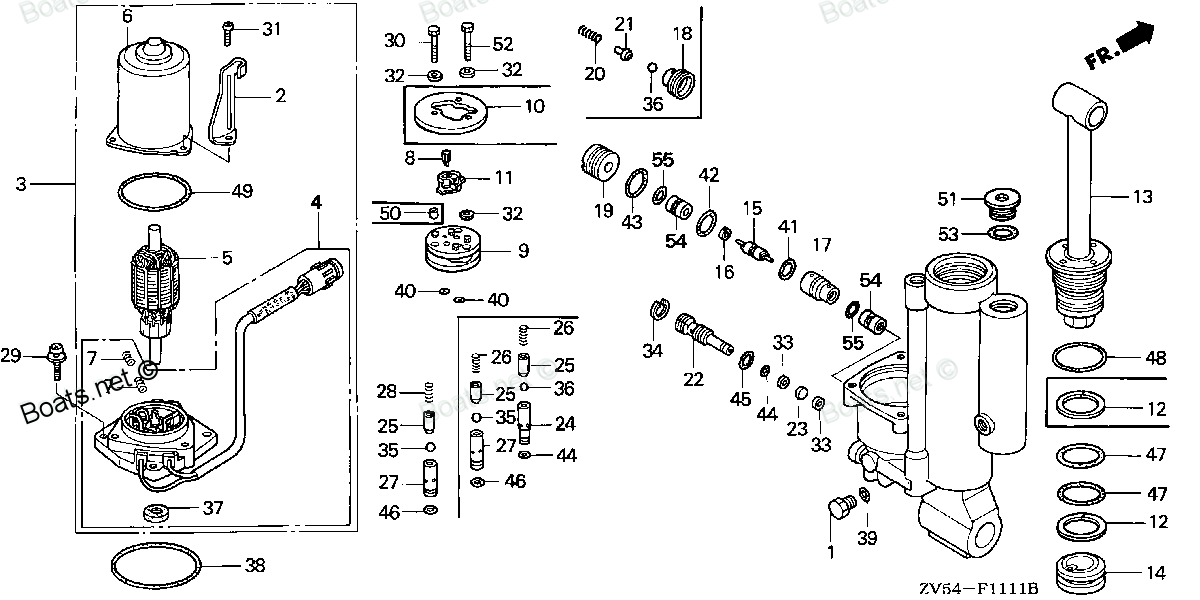
SEAT
. Honda parts")
Price: query
Rating:
You can buy parts:
As an associate, we earn commssions on qualifying purchases through the links below

$57.42
21-04-2024
0.25[0.11] pounds
US: PowerToolReplacement
Honda 56191-ZV5-821 Seat B Valve
Honda Genuine Honda part that fits your specific vehicle || Valve Seat || Part Number: 56191-ZV5-821 || Manufactured to meet specifications for fit, form, and function
Honda Genuine Honda part that fits your specific vehicle || Valve Seat || Part Number: 56191-ZV5-821 || Manufactured to meet specifications for fit, form, and function
Number on catalog scheme: 27
Compatible models:
Honda entire parts catalog list:
- POWER TILT COMPONENTS » 56191-ZV5-821
- POWER TILT COMPONENTS » 56191-ZV5-821
- POWER TILT COMPONENTS » 56191-ZV5-821
- POWER TILT COMPONENTS » 56191-ZV5-821
- POWER TILT COMPONENTS » 56191-ZV5-821
- POWER TILT COMPONENTS » 56191-ZV5-821
- POWER TILT COMPONENTS » 56191-ZV5-821
- POWER TILT COMPONENTS » 56191-ZV5-821
- POWER TILT COMPONENTS » 56191-ZV5-821
- POWER TILT COMPONENTS » 56191-ZV5-821
- POWER TILT COMPONENTS » 56191-ZV5-821
Information:
Care must be taken to ensure that fluids are contained during performance of inspection, maintenance, testing, adjusting, and repair of the product. Be prepared to collect the fluid with suitable containers before opening any compartment or disassembling any component containing fluids.Refer to Special Publication, NENG2500, "Cat Dealer Service Tool Catalog" or refer to Special Publication, PECJ0003, "Cat Shop Supplies and Tools Catalog" for tools and supplies suitable to collect and contain fluids on Cat products.Dispose of all fluids according to local regulations and mandates.
Do not drain the oil when the engine is cold. As the oil cools, waste particles settle on the bottom of the oil pan. The waste particles are not removed when the cold oil is drained. Drain the crankcase when the oil is warm. This method allows proper draining of the waste particles that are suspended in the oil.Failure to follow this recommended procedure will allow the waste particles to be recirculated through the engine lubrication system with the new oil.
After the engine has been operated at normal operating temperature, STOP the engine. Note: Drain the oil into a suitable container. DO NOT drain the oil into the bilge sump. Dispose of the oil according to local regulations.Note: If a suction device is used in order to remove the oil from the oil pan, ensure that the suction device is clean. Using a clean suction device prevents dirt from entering into the oil pan. Be careful not to strike the engine oil suction tubes or the piston cooling jets.
Open the oil drain valve. After the oil has drained, close the valve
Drain the oil according to the equipment on the engine. If the engine has a pump for removing dirty oil, connect a hose to the outlet of the pump. Place the hose in a suitable container. Open the valve for the drain line. The two marks on the valve must be turned so that one mark points to the pump and the second mark points to the drain line. Operate the pump until the crankcase is empty. Close the valve to the drain line. Disconnect the hose.
Replace the engine oil filter elements before filling the crankcase with new oil. Replace the Oil Filter Elements
Replace the engine oil filters at every engine oil change.Note: Do not attempt to clean the used oil filters. Used oil filters will retain waste particles. The used oil filters would not filter the oil properly.Service tools are available to aid in the service of oil filters. Consult your Cat dealer for the part names and the part numbers. Follow the instructions that are supplied with the service tools. If the service tools are not used, perform the following appropriate procedure.Replacing the Engine Oil Filters With the Engine Stopped (Standard Oil Filters)
Perform the following procedure after the oil has been drained.
Remove used oil filters and properly discard the used oil filters.
Illustration 1 g00103713
Typical filter mounting base and filter gasket
Clean the sealing surface of the filter mounting base. Make sure that the former oil filter gaskets are removed.
Apply a thin film of clean engine oil to the seal of each new filter gasket.
Do not fill the oil filters with oil before installing them. This oil would not be filtered and could be contaminated. Contaminated oil can cause accelerated wear to engine components.
Install the filters by hand. Tighten each filter according to the instructions that are printed on the filter. Note: You may need to use a Cat strap wrench, or another suitable tool, in order to turn the filters to the amount that is required for final installation. Make sure that the installation tool does not damage the filters. Do not overtighten the oil filter.Replacing the Engine Oil Filters During Engine Operation (Duplex Oil Filter System Only)
This filter contains hot, pressurized oil that can cause burns and fire hazards, which may result in bodily injury or death. Follow the instructions given in this Operation and Maintenance Manual and stop the engine if rapid air movement exists to blow the oil.
If the engine is equipped with duplex oil filters, the engine oil filter elements can be changed while the engine is in operation.
Illustration 2 g03137997
Duplex oil filters
(1) Filter 2
(2) Oil selector lever
(3) Filter 1
(4) Air purge screw for Filter 1
(5) Pressure relief valve for Filter 1
(6) Base for the oil selector lever
(7) Pressure relief valve for Filter 2
(8) Air purge screw for Filter 2
Illustration 3 g03138001
Instruction film for the engine oil selector valve
(9) "MAIN RUN" for Filter 1
(10) "AUXILIARY RUN" for the Filter 1
(11) "BOTH FLOW" for normal engine operation
(12) "AUXILIARY RUN" for Filter 2
(14) "MAIN RUN" for Filter 2
Main Run Filter 1 - The oil selector valve is in this position at the start of the oil filter change procedure for Filter 2. 100% of the oil flows to Filter 1.
Auxiliary Run for Filter 1 - A small stream of oil fills Filter 2 with most oil flowing through Filter 1.
Both Flow - Normal position for engine operation. Oil is flowing equally to Filter 1 and to Filter 2.
Auxiliary Run Filter 2 - A small stream of oil fills Filter 1 with most oil flowing through Filter 2.
Parts seat Honda:
19272-881-810

19272-881-810 SEAT, WATER MOUTH (Honda Code 1541150).
BF115A1 LA, BF115A1 LCA, BF115A1 XA, BF115A1 XCA, BF115A2 LA, BF115A2 LCA, BF115A2 XA, BF115A2 XCA, BF115A3 LA, BF115A3 LCA, BF115A3 XA, BF115A3 XCA, BF115A4 LA, BF115A4 LCA, BF115A4 XA, BF115A4 XCA, BF115A5 LA, BF115A5 LCA, BF115A5 XA, BF115A5 XCA,
14775-ZV5-000
14775-ZV5-000 SEAT, VALVE SPRING (Honda Code 3701638).
BF35AM LHA, BF35AM LRA, BF35AM LRTA, BF35AM SHA, BF35AM XRTA, BF40A1 LHA, BF40A1 LHTA, BF40A1 LRA, BF40A1 LRTA, BF40A1 XRTA, BF40A2 LHA, BF40A2 LHTA, BF40A2 LRA, BF40A2 LRTA, BF40A2 XRTA, BF40A3 LHA, BF40A3 LHTA, BF40A3 LRA, BF40A3 LRTA, BF40A3 XRTA,
56162-ZV5-821
56162-ZV5-821 SEAT D, VALVE (Honda Code 4594594).
BF35AM LRTA, BF35AM XRTA, BF40AW LHTA, BF40AW LRTA, BF40AW XRTA, BF45AM LRTA, BF45AM SRTA, BF45AM XRTA, BF50AW LHTA, BF50AW LRTA, BF50AW XRTA
56172-ZV5-821
56172-ZV5-821 SEAT, PLATE (Honda Code 4594644).
BF35AM LRTA, BF35AM XRTA, BF40AW LHTA, BF40AW LRTA, BF40AW XRTA, BF45AM LRTA, BF45AM SRTA, BF45AM XRTA, BF50AW LHTA, BF50AW LRTA, BF50AW XRTA
56181-ZV5-821

56181-ZV5-821 SEAT, VALVE (Honda Code 4594651).
BF35AM LRTA, BF35AM XRTA, BF40AW LHTA, BF40AW LRTA, BF40AW XRTA, BF45AM LRTA, BF45AM SRTA, BF45AM XRTA, BF50AW LHTA, BF50AW LRTA, BF50AW XRTA
56191-ZV5-822
56191-ZV5-822 SEAT B, VALVE (Honda Code 6013007).
BF40A1 LHTA, BF40A1 LRTA, BF40A1 XRTA, BF40A2 LHTA, BF40A2 LRTA, BF40A2 XRTA, BF40A3 LHTA, BF40A3 LRTA, BF40A3 XRTA, BF40AW LHTA, BF40AW LRTA, BF40AX LHTA, BF40AX LRTA, BF40AX XRTA, BF40AY LHTA, BF40AY LRTA, BF40AY XRTA, BF50A1 LHTA, BF50A1 LRTA, BF5