877761Q01 FILTER, Oil Quicksilver Branded Mercury
1F75413HD
FILTER

Price: query
Rating:
You can buy parts:
As an associate, we earn commssions on qualifying purchases through the links below

$17.88
23-09-2024
1.0[0.45] Pounds
CN: FILTRO CLUB
YAQITR Oil Filter 877761Q01 Inline Fuel Filter 879885Q Replace For Select Mercury and Mariner 75-115hp Outboards 1.7L 1B366823 through 2B094995 and 150hp EFI 4-Stroke Outboards 1B905505 & above
YAQITR ✔️ VERSATILE COMPATIBILITY: Designed to Operate with All Synthetic,Conventional,And Blended Motor Oils Fuel Strainer Filter, Pump Strainer,Fuel Pressure || ✔️ Oil Filter Replace Applications: For Mercury 75hp FourStroke EFI (2.1L) 1B366823-2B094995 Mercury 90hp FourStroke EFI (2.1L) 1B366823-2B094995 Mercury 115hp FourStroke EFI (2.1L) 1B366823-2B094995 Mercury 150hp FourStroke EFI || ✔️ Outboard Motor 879885Q Fuel Filter Assembly replace for Filter those particles before they can get to your engine. Used on 30/40hp EFI FourStroke outboard, the 4-cylinder (996 cc) 40/50/60hp. EFI FourStroke outboards, the 75-115hp FourStroke (1.7L, serial No. 1B366823-2B094995), the 75-115hp FourStroke (2.1L, serial No. 2B094996 and above), the 150hp EFI FourStroke (1B905505 and above) and 135-400hp Verado outboards. || ✔️ All OEM Part Numbers and Logos are to be Used for Identification Purposes Only
YAQITR ✔️ VERSATILE COMPATIBILITY: Designed to Operate with All Synthetic,Conventional,And Blended Motor Oils Fuel Strainer Filter, Pump Strainer,Fuel Pressure || ✔️ Oil Filter Replace Applications: For Mercury 75hp FourStroke EFI (2.1L) 1B366823-2B094995 Mercury 90hp FourStroke EFI (2.1L) 1B366823-2B094995 Mercury 115hp FourStroke EFI (2.1L) 1B366823-2B094995 Mercury 150hp FourStroke EFI || ✔️ Outboard Motor 879885Q Fuel Filter Assembly replace for Filter those particles before they can get to your engine. Used on 30/40hp EFI FourStroke outboard, the 4-cylinder (996 cc) 40/50/60hp. EFI FourStroke outboards, the 75-115hp FourStroke (1.7L, serial No. 1B366823-2B094995), the 75-115hp FourStroke (2.1L, serial No. 2B094996 and above), the 150hp EFI FourStroke (1B905505 and above) and 135-400hp Verado outboards. || ✔️ All OEM Part Numbers and Logos are to be Used for Identification Purposes Only

$18.99
02-10-2024
CN: Bond Automotive Part
BANGTE 35-877761K01 Oil Filter with Tool Replace For Mercury and Mariner 75 HP Through 115 HP Outboards and 150 HP EFI 4-Stroke Outboards,Replace Quicksilver 877761Q01
BANGTE Part Number:35-877761K01 Replace Quicksilver 877761Q01 || It is compatible with 4-stroke engines, including the 150 hp EFI and 115 hp FourStroke Outboards. || Packing list:1*Oil Filter Tool with filter || Manufactured to OEM standards and rigorously tested at the factory
BANGTE Part Number:35-877761K01 Replace Quicksilver 877761Q01 || It is compatible with 4-stroke engines, including the 150 hp EFI and 115 hp FourStroke Outboards. || Packing list:1*Oil Filter Tool with filter || Manufactured to OEM standards and rigorously tested at the factory

3-PACK BAIZHIHUA LF-6511 Premium Oil Filter Replace 35-877761Q01, 877761Q01, 35-877761K01, 18-7758 Fits Mercury and Mariner 75HP 80HP 90HP 100HP 115HP 135HP 150HP Outboard Engine EFI 4-Stroke Outboard
BAIZHIHUA Replaces : 35-877761Q01, 877761Q01, 35-877761K01, 18-7758 || Compatible with :Mercury and Mariner 75HP 80HP 90HP 100HP 115HP 135HP 150HP Outboard Engine EFI 4-Stroke Outboard || 100% Brand New Aftermarket Item. Has Same Function as Original.Built to Strict Quality Standards and Use Superior Quality Parts. || Easy to Install, Saves Time and Effort, and is Convenient to Use. Warm Hint: Oil contamination can lead to costly repairs and engine downtime.So please replace the filter regularly. || Package Included: 3 x Oil Filter 35-877761Q01
BAIZHIHUA Replaces : 35-877761Q01, 877761Q01, 35-877761K01, 18-7758 || Compatible with :Mercury and Mariner 75HP 80HP 90HP 100HP 115HP 135HP 150HP Outboard Engine EFI 4-Stroke Outboard || 100% Brand New Aftermarket Item. Has Same Function as Original.Built to Strict Quality Standards and Use Superior Quality Parts. || Easy to Install, Saves Time and Effort, and is Convenient to Use. Warm Hint: Oil contamination can lead to costly repairs and engine downtime.So please replace the filter regularly. || Package Included: 3 x Oil Filter 35-877761Q01
Number on catalog scheme: 23
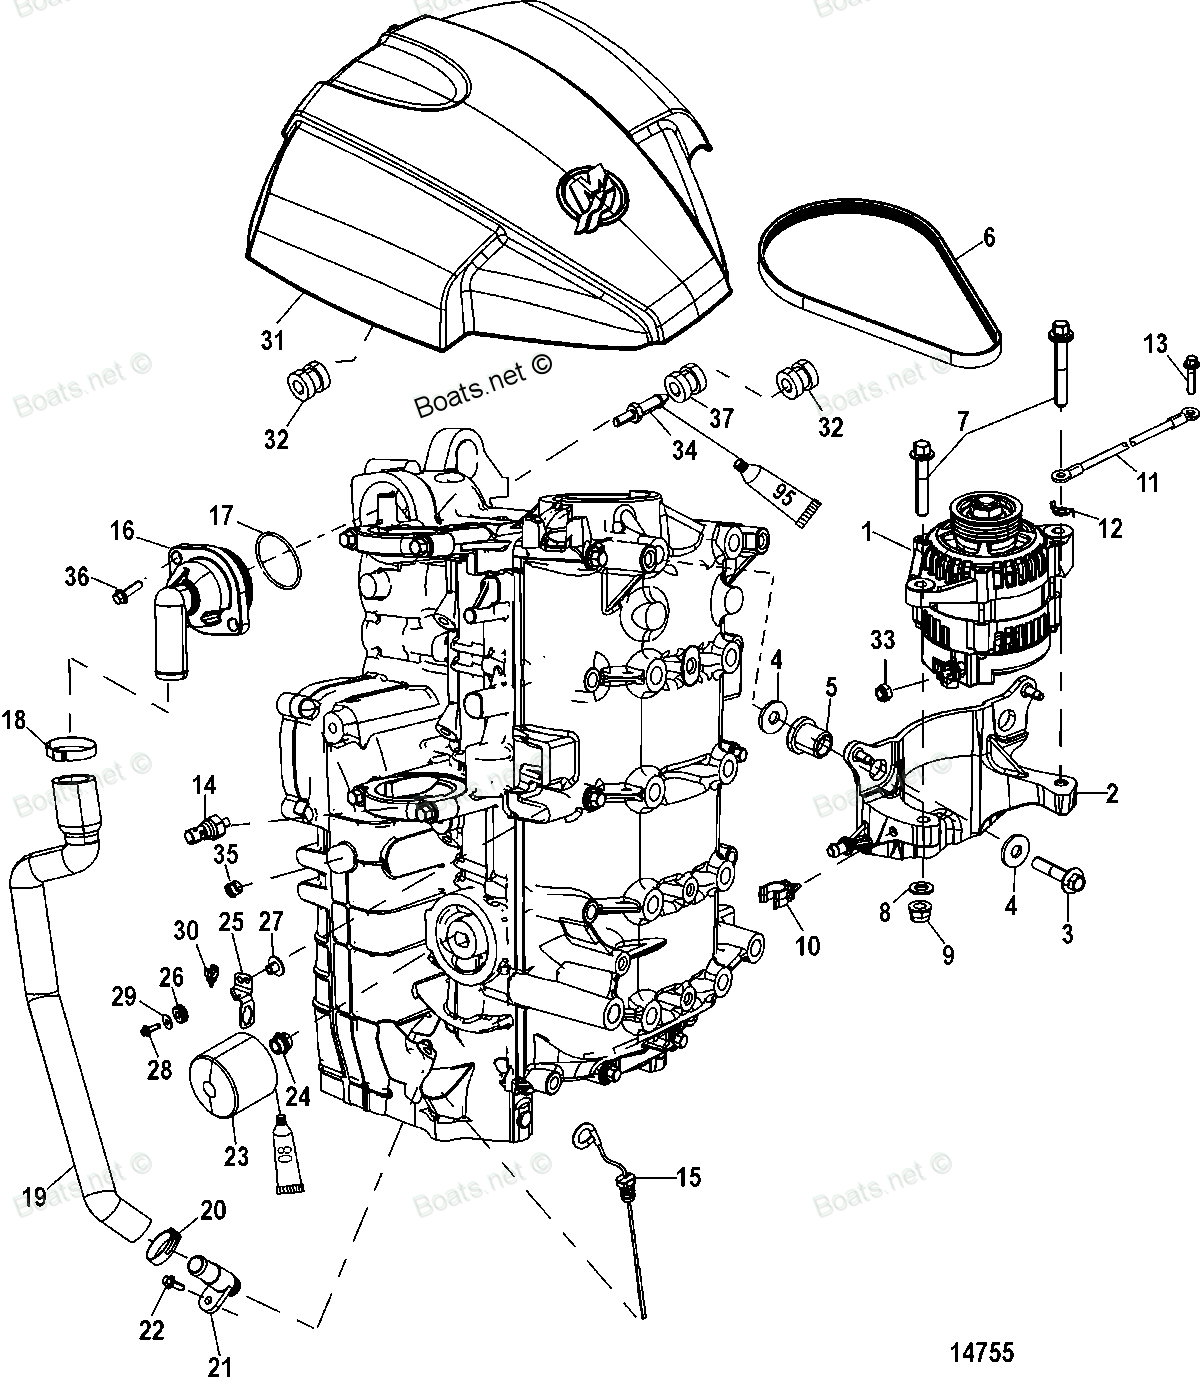
Compatible models:
1F75413HD
Mercury
Mercury entire parts catalog list:
Information:
Care must be taken to ensure that fluids are contained during performance of inspection, maintenance, testing, adjusting and repair of the product. Be prepared to collect the fluid with suitable containers before opening any compartment or disassembling any component containing fluids.Refer to Special Publication, NENG2500, "Caterpillar Tools and Shop Products Guide" for tools and supplies suitable to collect and contain fluids on Caterpillar products.Dispose of all fluids according to local regulations and mandates.
Keep all parts clean from contaminants.Contaminants may cause rapid wear and shortened component life.
The Electronic Control Module (ECM) contains no moving parts. Replacement of the ECM can be costly. Replacement can also be a time consuming task. Follow the troubleshooting procedures in this manual in order to be sure that replacing the ECM will correct the problem. Verify that the suspect ECM is the cause of the problem.Note: Ensure that the ECM is receiving power and that the ECM is properly wired to the negative battery circuit before a replacement of the ECM is attempted. Refer to Troubleshooting, "Electrical Power Supply Circuit - Test".A test ECM can be used to determine if the ECM is faulty. Install a test ECM in place of the suspect ECM. Flash program the correct flash file into the test ECM. Program the parameters for normal operation. The parameters must match the parameters in the suspect ECM. Refer to the following test steps for details. If the use of a test ECM resolves the problem, reconnect the suspect ECM in order to verify that the problem returns. Replace the ECM only if the test ECM resolves the problem and the problem returns with the suspect ECM.Note: When a new ECM is not available, you may need to remove an ECM from an engine that is not in service. The interlock code for the replacement ECM must match the interlock code for the suspect ECM. Be sure to record the parameters from the replacement ECM on a "Parameters Worksheet" for the engine. Use the "Copy Configuration/ECM Replacement" feature that is found under the "Service" menu on the Caterpillar Electronic Technician (ET).
If the flash file part number and the and engine application are not matched, engine damage may result.
Perform the following procedure in order to replace the ECM.
Record the configuration data:
Connect Cat ET to the service tool connector. Refer to Troubleshooting, "Electronic Service Tools".
Print the parameters from the "Configuration" screen on Cat ET. If a printer is unavailable, record all of the parameters on the "Parameter Worksheet". Record any logged diagnostic codes and logged event codes for your records.
Use the "Copy Configuration/ECM Replacement" feature that is found under the "Service" menu on Cat ET. Select "Load from ECM" in order to copy the configuration data from the suspect ECM.Note: If the "Copy Configuration" process fails and the parameters were not obtained in Step 1.a, the parameters must be obtained elsewhere. Some of the parameters are stamped on the engine information plate. Most of the parameters must be obtained from the factory.
Remove the ECM:
Turn the keyswitch to the OFF position.
Disconnect the P1 and P2 ECM connectors.
Use a suitable container to catch any fuel that might spill. Clean up any spilled fuel immediately.
Do not allow dirt to enter the fuel system. Thoroughly clean the area around a fuel system component that will be disconnected. Fit a suitable cover over disconnected fuel system component.
Remove the fuel lines from the ECM.
Disconnect the ECM ground strap.
Remove the mounting bolts from the ECM.
If you are flash programming, go to Step 5. If you are physically replacing the personality module, proceed to Step 3.Note: Flash programming is the preferred method for replacing the ECM software. The personality module can be physically removed if flash programming is unsuccessful.
Moisture entry into the ECM from improper servicing can result in ECM failure.
Remove the personality module chip from the old ECM.
Remove the tag wire from the back cover of the ECM.
Illustration 1 g01132254
Back side of the ECM (1) Cover screws
Remove cover screws (1) from the back cover of the ECM.
Remove the O-ring seal from the cover.
Remove the personality module (EPROM chip) by squeezing the tabs on the ends of the blue plastic case (EPROM carrier). Pull the module straight out of the ECM.
Improper O-ring placement could result in moisture damage from improper sealing. Do not over tighten screws! This could result in damaged threads and moisture damage from improper sealing.
Install the personality module into the new ECM.
Carefully seat the personality module into the personality module socket.Note: Do not use excessive force to insert the module into the socket. The socket will accept the personality module if the personality module is oriented correctly. A audible click is heard when the personality module is seated into the socket.
Install the O-ring seal for the cover of the personality module.
Install the access cover for the personality module on the ECM. Tighten the cover screws for the personality module to a torque of 2.25 0.25 N m (20 2 lb in).
Install the replacement ECM.
Use the old mounting hardware to install the replacement ECM.
Connect the fuel lines (if equipped).
Verify that the fuel lines are installed correctly. The fuel lines must not put tension on the ECM. Rubber grommets are used to protect the ECM from excessive vibration. The ECM should move slightly in the rubber grommets. If the ECM cannot be moved sli
Parts filter Mercury:
809878A 1
809878A 1 FILTER KIT
10402139D, 1050302SD, 1055207DB, 1055207UD, 1055207VB, 1075217DD, 1075217FD, 1075217PD, 1075217VD, 10752L7DF, 10752L7FF, 1075317DB, 1075317FB, 1075412DB, 1075412DD, 1075412DN, 1075412FB, 1075412FY, 1075D73FY, 1075D73HY, 1090412DB, 1090412DC, 1090412D
879885T

879885T FILTER, Fuel
1135V13ED, 1135V13FB, 1135V13HB, 1200V13DD, 1200V13ED, 1200V13ER, 1200V13FB, 1200V13HB, 1200V23ED, 1200V23ER, 1225V13EB, 1225V13EF, 1225V23ED, 1225V33EB, 1250V23EF, 1250V34EB, 1275V23ER, 1275V24EB, 1275V34EB, 1300V23EB, 1300V24EF, 1300V24KD, 1300V33E
877761K01

897575T01
