892864T06 HOUSING ASSEMBLY, Thermostat Mercury
1F75413HD
HOUSING

Price: query
Rating:
You can buy parts:
As an associate, we earn commssions on qualifying purchases through the links below

Thermostat Housing Assy Fits for Mercury 75-150HP Outboard Stroke 80 100 115 150 892864T06 8M0090819 18-3635 8M0137816 8M0162139
Automkt Fits for: 75-150HP Outboard Stroke 80 100 115 150 || Replaces Part Number: 892864T06; 8M0090819; 18-3635; 8M0137816; 8M0162139 || Precise temperature control: Ensures engine operates at optimal conditions || Installation: Easy to install; Plug and Play; No special tools needed for installation; Save time and effort || After-sales Service: Experienced customer service resolves inquiries promptly; Professional technicians provide support anytime
Automkt Fits for: 75-150HP Outboard Stroke 80 100 115 150 || Replaces Part Number: 892864T06; 8M0090819; 18-3635; 8M0137816; 8M0162139 || Precise temperature control: Ensures engine operates at optimal conditions || Installation: Easy to install; Plug and Play; No special tools needed for installation; Save time and effort || After-sales Service: Experienced customer service resolves inquiries promptly; Professional technicians provide support anytime

FyJcBdd 892864T06 Thermostat with Housing Assembly for Mer-cu-ry 75 80 90 100 115 135 150HP Outboard 892864T06 18-3635 Uan Marine Parts
FyJcBdd Sophisticated production, provides excellent quality, stable performance. || Manufacturing ensuring maximum durability, not easy to damage, with good performance and long service life. || Installation and replacement method is simple. Wonderful replacement for the old or broken one, directly fitment. || Every product has quality inspection before leaving the factory. || Pictures are taken by the real product.
FyJcBdd Sophisticated production, provides excellent quality, stable performance. || Manufacturing ensuring maximum durability, not easy to damage, with good performance and long service life. || Installation and replacement method is simple. Wonderful replacement for the old or broken one, directly fitment. || Every product has quality inspection before leaving the factory. || Pictures are taken by the real product.

ATYeRy 892864A06 122°F 50°C Thermostat Kit for Mer-cu-ry 75 80 90 100 115 135 150 HP Replaces 892864T06 18-3635 Engines uanmarine Accessoires
ATYeRy Sophisticated production, provides excellent quality, stable performance. || Manufacturing ensuring maximum durability, not easy to damage, with good performance and long service life. || Installation and replacement method is simple. Wonderful replacement for the old or broken one, directly fitment. || Every product has quality inspection before leaving the factory. || Pictures are taken by the real product.
ATYeRy Sophisticated production, provides excellent quality, stable performance. || Manufacturing ensuring maximum durability, not easy to damage, with good performance and long service life. || Installation and replacement method is simple. Wonderful replacement for the old or broken one, directly fitment. || Every product has quality inspection before leaving the factory. || Pictures are taken by the real product.
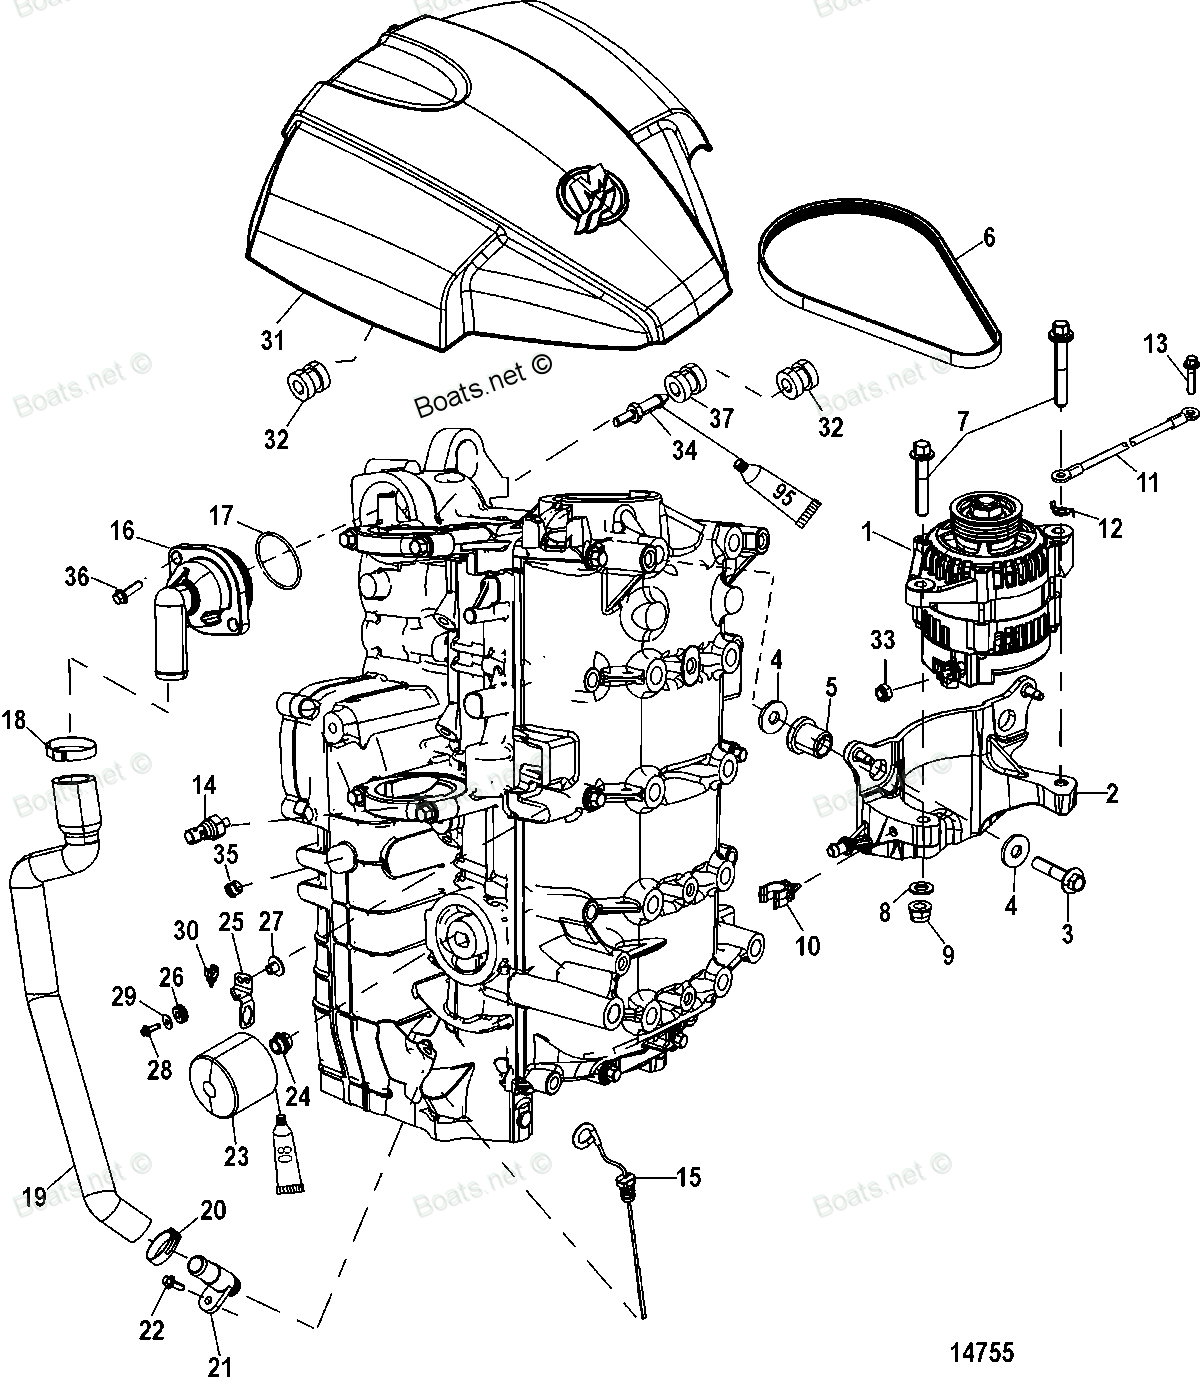
Number on catalog scheme: 16
Compatible models:
1F75413HD
Mercury
Mercury entire parts catalog list:
Information:
Drain
Pressurized System: Hot coolant can cause serious burns. To open the cooling system filler cap, stop the engine and wait until the cooling system components are cool. Loosen the cooling system pressure cap slowly in order to relieve the pressure.
Stop the engine and allow the engine to cool. Loosen the cooling system filler cap slowly in order to relieve any pressure. Remove the cooling system filler cap.
Open the cooling system drain valve (if equipped). If the cooling system is not equipped with a drain valve, remove the cooling system drain plugs.Allow the coolant to drain.
Dispose of used engine coolant properly or recycle. Various methods have been proposed to reclaim used coolant for reuse in engine cooling systems. The full distillation procedure is the only method acceptable by Caterpillar to reclaim the used coolant.
For information regarding the disposal and the recycling of used coolant, consult your Caterpillar dealer or consult Caterpillar Dealer Service Tool Group:Outside Illinois: 1-800-542-TOOLInside Illinois: 1-800-541-TOOLCanada: 1-800-523-TOOLFlush
Flush the cooling system with clean water in order to remove any debris.Note: If equipped, be sure to flush the heater and any related supply and return lines.
Close the drain valve (if equipped). Clean the drain plugs. Install the drain plugs. For the proper torque, refer to the Specifications Manual, SENR3130, "Torque Specifications".
Fill the cooling system no faster than 19 L (5 US gal) per minute to avoid air locks.
Fill the cooling system with clean water. Install the cooling system filler cap.
Start and run the engine at low idle until the temperature reaches 49 to 66 °C (120 to 150 °F).
Stop the engine and allow the engine to cool. Loosen the cooling system filler cap slowly in order to relieve any pressure. Remove the cooling system filler cap. Open the drain valve (if equipped) or remove the cooling system drain plugs. Allow the water to drain. Flush the cooling system with clean water. Close the drain valve (if equipped). Clean the drain plugs. Install the drain plugs. For the proper torque, refer to the Specifications Manual, SENR3130, "Torque Specifications".Fill
Fill the cooling system no faster than 19 L (5 US gal) per minute to avoid air locks.
Fill the cooling system with Extended Life Coolant (ELC). See Special Publication, SEBU6385, "Caterpillar On-highway Diesel Truck Engine Fluids Recommendations" for more information on cooling system specifications. Do not install the cooling system filler cap.
Start and run the engine at low idle for 5 minutes. Then, increase the engine rpm to high idle. Run the engine at high idle for one minute in order to purge the air from the cavities of the engine block.
Check the coolant level. Maintain the coolant level within 13 mm (0.5 inch) below the bottom of the pipe for filling. Maintain the coolant level within 13 mm (0.5 inch) to the proper level on the sight glass (if equipped).
Clean the cooling system filler cap. Inspect the gasket that is on the cooling system filler cap. If the gasket that is on the cooling system filler cap is damaged, discard the old cooling system filler cap and install a new cooling system filler cap. If the gasket that is on the cooling system filler cap is not damaged, use a 9S-8140 Pressurizing Pump in order to pressure test the cooling system filler cap. The correct pressure for the cooling system filler cap is stamped on the face of the cooling system filler cap. If the cooling system filler cap does not retain the correct pressure, install a new cooling system filler cap.
Start the engine. Inspect the cooling system for leaks and for proper operating temperature.
Parts housing Mercury:
48414
48414 HOUSING
1035204, 1035207, 1040200, 10402139D, 1045217, 1050200, 1050302SD, 1050312LD, 1055207DB, 1055207UD, 1055207VB, 1070312BC, 1070717, 1075217DD, 1075217FD, 1075217PD, 1075217VD, 10752L7DF, 10752L7FF, 1075317DB, 1075317FB, 10754120D, 1075412DB, 1075412DD
817275A 2

817275A 2 HOUSING KIT, Upper Water Pump
1050302SD, 1050312LD, 1055207DB, 1055207UD, 1055207VB, 1075217DD, 1075217FD, 1075217PD, 1075217VD, 10752L7DF, 10752L7FF, 1075317DB, 1075317FB, 10754120D, 1075412DB, 1075412DD, 1075412DN, 1075412FB, 1075412FY, 1075D73FY, 1075D73HY, 1090412DB, 1090412D
858576T04
880596T53
8M0005529
