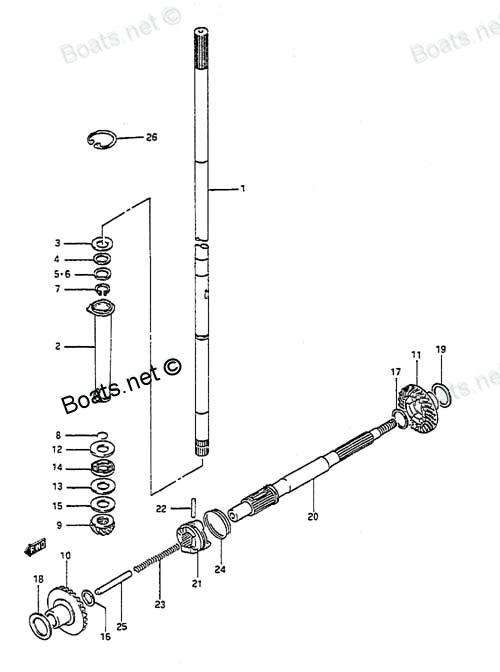
57110-92D02 DRIVESHAFT ASSEMBLY Suzuki
DT8CENK, DT8CENL, DT8CLJ, DT8CLK, DT8CLL, DT8CLM, DT8CNK, DT8CNL, DT8CSJ, DT8CSL, DT8CSM, DT8MCLN, DT8MCLP, DT8MCLS, DT8MCLT, DT8MCLV, DT8MCSN, DT8MCSP, DT8MCSR, DT8MCSS, DT8MCST, DT8MCSV, DT8MSLR, DT8SCK, DT9.9 CELK, DT9.9CELJ, DT9.9CELL, DT9.9CELM,
DRIVESHAFT

Price: query
Rating:
Number on catalog scheme: 1
Compatible models:
DT8CENK
DT8CENL
DT8CLJ
DT8CLK
DT8CLL
DT8CLM
DT8CNK
DT8CNL
DT8CSJ
DT8CSL
DT8CSM
DT8MCLN
DT8MCLP
DT8MCLS
DT8MCLT
DT8MCLV
DT8MCSN
DT8MCSP
DT8MCSR
DT8MCSS
DT8MCST
DT8MCSV
DT8MSLR
DT8SCK
DT9.9 CELK
DT9.9CELJ
DT9.9CELL
DT9.9CELM
DT9.9CELN
DT9.9CELP
DT9.9CELR
DT9.9CELS
DT9.9CELT
DT9.9CENK
DT9.9CESJ
DT9.9CESK
DT9.9CESL
DT9.9CESM
DT9.9CESN
DT9.9CESP
DT9.9CESR
DT9.9CESS
DT9.9CEST
DT9.9CNELP
DT9.9CNELR
DT9.9CNELS
DT9.9CNELT
DT9.9CNEXP
DT9.9CNEXR
DT9.9CNEXS
DT9.9CNEXT
DT9.9CNEXV
DT9.9CNJ
DT9.9CNK
DT9.9CNL
DT9.9CNLN
DT9.9MCLJ
DT9.9MCLK
DT9.9MCLL
DT9.9MCLM
DT9.9MCLN
DT9.9MCLP
DT9.9MCLR
DT9.9MCLS
DT9.9MCLT
DT9.9MCLV
DT9.9MCNLR
DT9.9MCNLT
DT9.9MCNLV
DT9.9MCSJ
DT9.9MCSK
DT9.9MCSL
DT9.9MCSM
DT9.9MCSN
DT9.9MCSP
DT9.9MCSR
DT9.9MCSS
DT9.9MCST
DT9.9MCSV
Suzuki
Suzuki entire parts catalog list:
- TRANSMISSION » 57110-92D02
- TRANSMISSION » 57110-92D02
- TRANSMISSION » 57110-92D02
- TRANSMISSION » 57110-92D02
- TRANSMISSION » 57110-92D02
- TRANSMISSION » 57110-92D02
- TRANSMISSION » 57110-92D02
- TRANSMISSION » 57110-92D02
- TRANSMISSION » 57110-92D02
- TRANSMISSION » 57110-92D02
- TRANSMISSION » 57110-92D02
- TRANSMISSION » 57110-92D02
- TRANSMISSION » 57110-92D02
- TRANSMISSION » 57110-92D02
- TRANSMISSION » 57110-92D02
- TRANSMISSION » 57110-92D02
- TRANSMISSION » 57110-92D02
- TRANSMISSION » 57110-92D02
- TRANSMISSION » 57110-92D02
- TRANSMISSION » 57110-92D02
- TRANSMISSION » 57110-92D02
- TRANSMISSION » 57110-92D02
- TRANSMISSION » 57110-92D02
- TRANSMISSION » 57110-92D02
- TRANSMISSION » 57110-92D02
- TRANSMISSION » 57110-92D02
- TRANSMISSION » 57110-92D02
- TRANSMISSION » 57110-92D02
- TRANSMISSION » 57110-92D02
- TRANSMISSION » 57110-92D02
- TRANSMISSION » 57110-92D02
- TRANSMISSION » 57110-92D02
- TRANSMISSION » 57110-92D02
- TRANSMISSION » 57110-92D02
- TRANSMISSION » 57110-92D02
- TRANSMISSION » 57110-92D02
- TRANSMISSION » 57110-92D02
- TRANSMISSION » 57110-92D02
- TRANSMISSION » 57110-92D02
- TRANSMISSION » 57110-92D02
- TRANSMISSION » 57110-92D02
- TRANSMISSION » 57110-92D02
- TRANSMISSION » 57110-92D02
- TRANSMISSION » 57110-92D02
- TRANSMISSION » 57110-92D02
- TRANSMISSION » 57110-92D02
- TRANSMISSION » 57110-92D02
- TRANSMISSION » 57110-92D02
- TRANSMISSION » 57110-92D02
- TRANSMISSION » 57110-92D02
- TRANSMISSION » 57110-92D02
- TRANSMISSION » 57110-92D02
- TRANSMISSION » 57110-92D02
- TRANSMISSION » 57110-92D02
- TRANSMISSION » 57110-92D02
- TRANSMISSION » 57110-92D02
- TRANSMISSION » 57110-92D02
- TRANSMISSION » 57110-92D02
- TRANSMISSION » 57110-92D02
- TRANSMISSION » 57110-92D02
- TRANSMISSION » 57110-92D02
- TRANSMISSION » 57110-92D02
- TRANSMISSION » 57110-92D02
- TRANSMISSION » 57110-92D02
- TRANSMISSION » 57110-92D02
- TRANSMISSION » 57110-92D02
- TRANSMISSION » 57110-92D02
- TRANSMISSION » 57110-92D02
- TRANSMISSION » 57110-92D02
- TRANSMISSION » 57110-92D02
- TRANSMISSION » 57110-92D02
- TRANSMISSION » 57110-92D02
- TRANSMISSION » 57110-92D02
- TRANSMISSION » 57110-92D02
- TRANSMISSION » 57110-92D02
- TRANSMISSION » 57110-92D02
- TRANSMISSION » 57110-92D02
- TRANSMISSION » 57110-92D02
- TRANSMISSION » 57110-92D02
Information:
Start By:
Remove the hood. Refer to Disassembly and Assembly, "Hood - Remove and Install". The information is in this manual.
Effective July 1, 1992 regulations prohibit the venting of any refrigerant into the atmosphere. Refer to Caterpillar publications Service Manuals, SENR3334, SENR5664, and NEDG5065 for the proper procedure, the proper equipment, and the proper tools needed in order to reclaim refrigerant from any Caterpillar equipment.
Personal injury can result from contact with refrigerant.Contact with refrigerant can cause frost bite. Keep face and hands away to help prevent injury.Protective goggles must always be worn when refrigerant lines are opened, even if the gauges indicate the system is empty of refrigerant.Always use precaution when a fitting is removed. Slowly loosen the fitting. If the system is still under pressure, release it slowly in a well ventilated area.Personal injury or death can result from inhaling refrigerant through a lit cigarette.Inhaling air conditioner refrigerant gas through a lit cigarette or other smoking method or inhaling fumes released from a flame contacting air conditioner refrigerant gas, can cause bodily harm or death.Do not smoke when servicing air conditioners or wherever refrigerant gas may be present.Use a certified recovery and recycling cart to properly remove the refrigerant from the air conditioning system.
Note: Put identification marks on all lines, hoses, wires, and tubes for installation purposes. Plug all lines, hoses, and tubes. This helps to prevent fluid loss and this helps to prevent contaminants from entering the oil system.
Reclaim the refrigerant from the air conditioning system.
Illustration 1 g00292376
Remove wire assembly (1) from the wire clip. Disconnect the quick connections on wire assemblies (1) and (2) .
Illustration 2 g00292378
Disconnect hydraulic hoses (4) and (5) from refrigerant compressor (3) . Remove the O-ring seals from hydraulic hoses (4) and (5) .
Illustration 3 g00292379
This is a view of the refrigerant compressor from a point that is below the machine.
Loosen bolt (6) from refrigerant compressor (3) and the mounting bracket.
Illustration 4 g00292377
Remove bolt (8) from refrigerant compressor (3) and mounting bracket (7) .
Tilt refrigerant compressor (3) toward the engine. Remove V-belt (9) from pulley (10) .
Illustration 5 g00292380
Remove bolt (6) from refrigerant compressor (3) and the mounting bracket. Remove refrigerant compressor (3) from the engine.Installation Procedure
Illustration 6 g00292380
Install refrigerant compressor (3) to the engine. Install bolt (6) to refrigerant compressor (3) and the mounting bracket. Do not tighten bolt (6) at this time.
Illustration 7 g00292377
Tilt refrigerant compressor (3) toward the engine. Install V-belt (9) to pulley (10) .
Install bolt (8) in mounting bracket (7) and refrigerant compressor (3) . Do not tighten bolt (8) at this time.
Adjust the tension of V-belt (9) . Refer to the Operation and Maintenance Manual, SEBU6447, "Fan, Alternator and Water Pump Belts - Inspect-Adjust-Replace" for the proper procedures.
Tighten bolts (6) and (8) .
Illustration 8 g00292378
Check the O-ring seals that were in the hose assemblies that were disconnected. If the O-ring seals are worn or damaged, use new parts for replacement. Connect hydraulic hoses (4) and (5) to refrigerant compressor (3) .
Illustration 9 g00292376
Connect the quick connections on wire assemblies (1) and (2) . Install wire assembly (1) in the wire clip.
Parts driveshaft Suzuki:
52111-92D30-0ED
52111-92D30-0ED DRIVESHAFT HOUSING
DT8CENK, DT8CENL, DT8CLJ, DT8CLK, DT8CLL, DT8CLM, DT8CNK, DT8CNL, DT8CSJ, DT8CSL, DT8CSM, DT8MCLN, DT8MCLP, DT8MCLS, DT8MCLT, DT8MCLV, DT8MCSN, DT8MCSP, DT8MCSR, DT8MCSS, DT8MCST, DT8MCSV, DT8MSLR, DT8SCK, DT9.9 CELK, DT9.9CELJ, DT9.9CELL, DT9.9CELM,
52111-92D20-0ED
52111-92D20-0ED DRIVESHAFT HOUSING
DT8CENK, DT8CENL, DT8CLJ, DT8CLK, DT8CLL, DT8CLM, DT8CNK, DT8CNL, DT8CSJ, DT8CSL, DT8CSM, DT8MCLN, DT8MCLP, DT8MCLS, DT8MCLT, DT8MCLV, DT8MCSN, DT8MCSP, DT8MCSR, DT8MCSS, DT8MCST, DT8MCSV, DT8MSLR, DT8SCK, DT9.9 CELK, DT9.9CELJ, DT9.9CELL, DT9.9CELM,
57110-92D15
57110-92D15 DRIVESHAFT ASSEMBLY
DT8CENK, DT8CENL, DT8CLJ, DT8CLK, DT8CLL, DT8CLM, DT8CNK, DT8CNL, DT8CSJ, DT8CSL, DT8CSM, DT8MCLN, DT8MCLP, DT8MCLS, DT8MCLT, DT8MCLV, DT8MCSN, DT8MCSP, DT8MCSR, DT8MCSS, DT8MCST, DT8MCSV, DT8MSLR, DT8SCK, DT9.9 CELK, DT9.9CELJ, DT9.9CELL, DT9.9CELM,
57110-92D25
57110-92D25 DRIVESHAFT ASSEMBLY (X)
DT9.9 CELK, DT9.9CELJ, DT9.9CELL, DT9.9CELM, DT9.9CELN, DT9.9CELP, DT9.9CELR, DT9.9CELS, DT9.9CELT, DT9.9CENK, DT9.9CESJ, DT9.9CESK, DT9.9CESL, DT9.9CESM, DT9.9CESN, DT9.9CESP, DT9.9CESR, DT9.9CESS, DT9.9CEST, DT9.9CNELP, DT9.9CNELR, DT9.9CNELS, DT9.