36890-93J00 WIRE HARNESS Suzuki
DF140, DF140, DF140, DF140A, DF140T, DF140T, DF140Z, DF140Z, DF140Z, DF140Z, DF15, DF15, DF15, DF150, DF150, DF150, DF150TX, DF150ZX, DF15A, DF15S, DF175, DF175, DF175, DF175TX, DF175ZX, DF200, DF200, DF200, DF200T, DF200Z, DF20A, DF225, DF225, DF225
WIRE

Price: query
Rating:
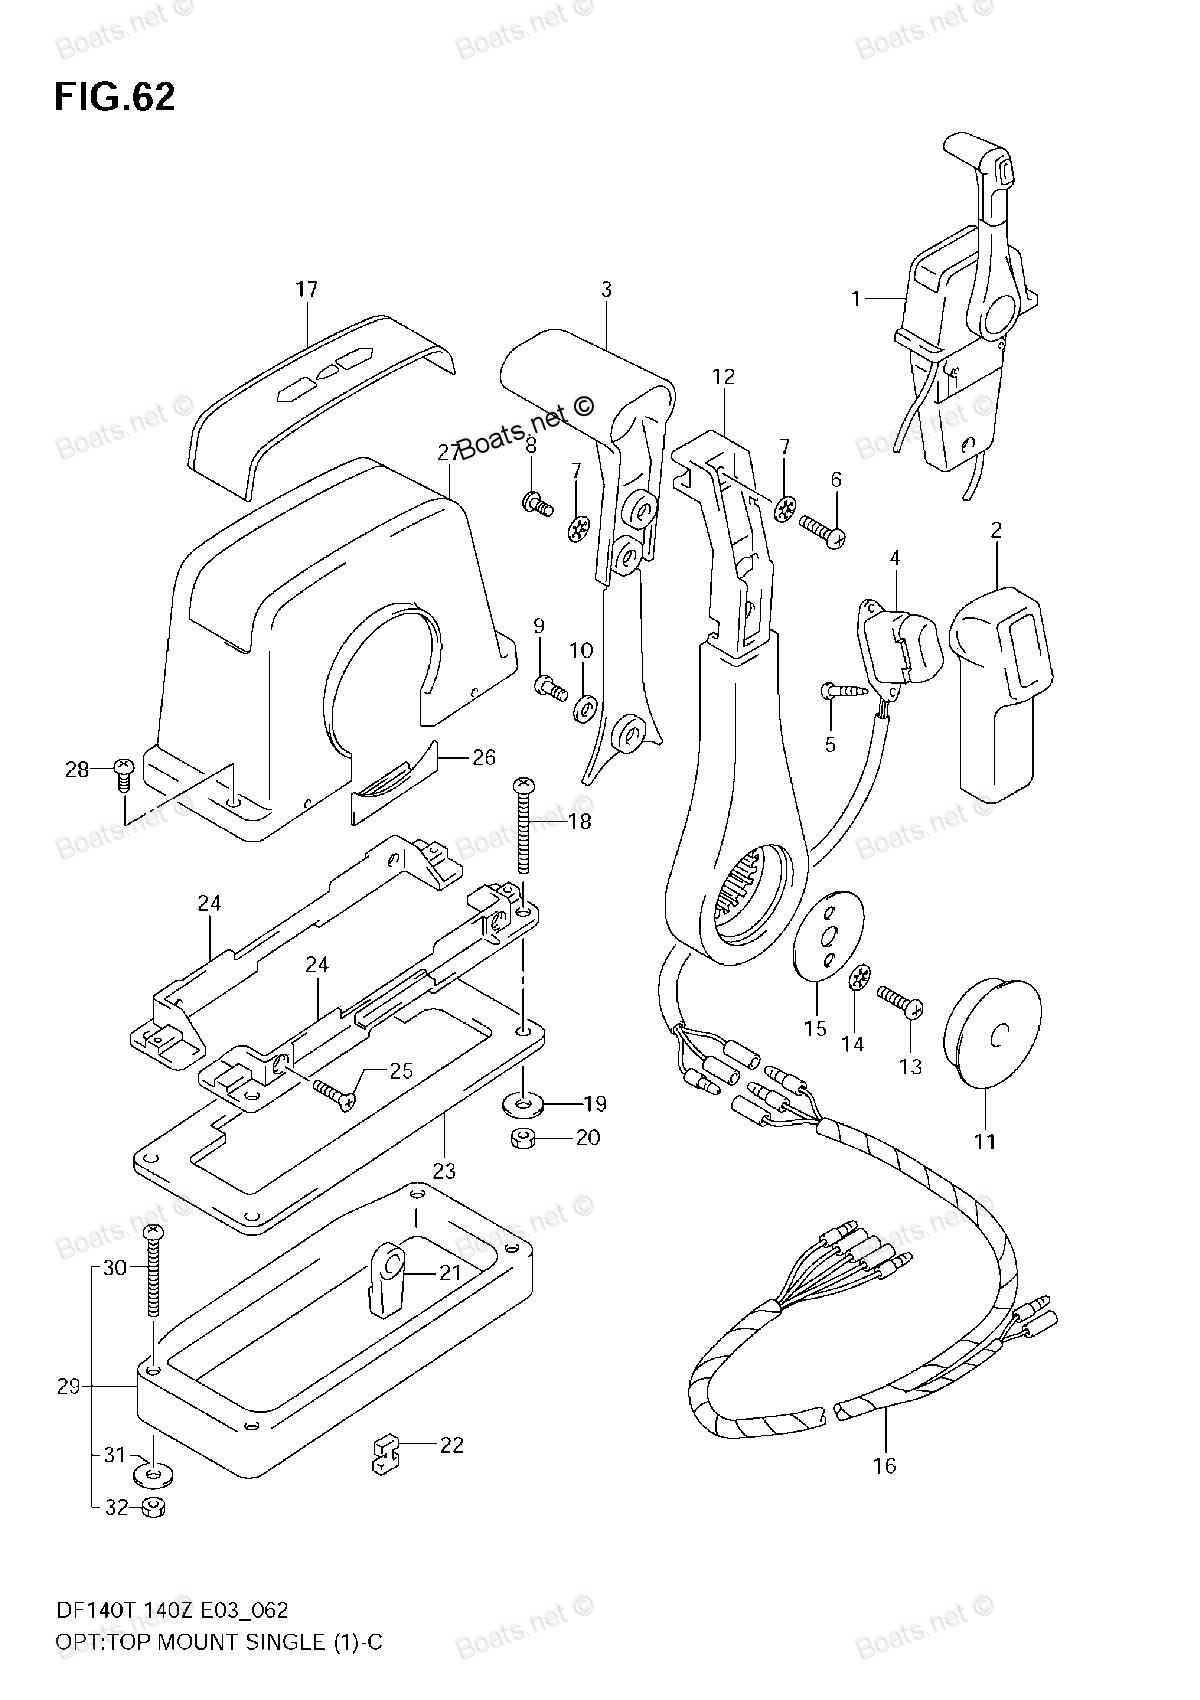
Number on catalog scheme: 16
Compatible models:
DF140
DF140A
DF140T
DF140Z
DF15
DF150
DF150TX
DF150ZX
DF15A
DF15S
DF175
DF175TX
DF175ZX
DF200
DF200T
DF200Z
DF20A
DF225
DF225T
DF225Z
DF25
DF25(R)S
DF250
DF250T
DF250Z
DF25Q
DF25Q(QR)
DF25R
DF25T
DF30
DF30Q
DF30Q(QR)
DF30T
DF40
DF40A
DF40QH
DF40TL
DF50
DF50A
DF50QH
DF50TL
DF60
DF60A
DF60HL
DF60TL
DF70
DF70A
DF70THL
DF70TL
DF80A
DF8A
DF8AR
DF9.9
DF9.9A
DF9.9AR
DF9.9R
DF9.9RL
DF9.9S
DF9.9TH
DF90A
DF99AR
DF99R
DF99TH
Suzuki
Suzuki entire parts catalog list:
- OPT:TOP MOUNT SINGLE (1)(MODEL:05-) » 36890-93J00
- OPT:TOP MOUNT SINGLE (1)(MODEL:05-07) » 36890-93J00
- OPT:TOP MOUNT SINGLE (1)(MODEL:05-) » 36890-93J00
- OPT:TOP MOUNT SINGLE (1) » 36890-93J00
- OPT:REMOTE CONTROL ASSY SINGLE (1) » 36890-93J00
- OPT:TOP MOUNT SINGLE (1)(MODEL:05-) » 36890-93J00
- OPT:TOP MOUNT SINGLE (1)(MODEL:05-09) » 36890-93J00
- OPT:TOP MOUNT SINGLE (1)(MODEL:05-) » 36890-93J00
- OPT:TOP MOUNT SINGLE (1)(MODEL:05-09) » 36890-93J00
- OPT:TOP MOUNT SINGLE (1)(MODEL:05-) » 36890-93J00
- OPT:TOP MOUNT SINGLE (1)(MODEL:05-) » 36890-93J00
- OPT:TOP MOUNT SINGLE (1)(MODEL:05-) » 36890-93J00
- OPT:TOP MOUNT SINGLE (1)(MODEL:05-09) » 36890-93J00
- OPT:TOP MOUNT SINGLE (1)(MODEL:05-) » 36890-93J00
- OPT:TOP MOUNT SINGLE (1)(MODEL:05-09) » 36890-93J00
- OPT:TOP MOUNT SINGLE (1)(MODEL:05-) » 36890-93J00
- OPT:TOP MOUNT SINGLE (1)(MODEL:05-) » 36890-93J00
- OPT:REMOTE CONTROL ASSY SINGLE (1) (DF15) » 36890-93J00
- OPT:REMOTE CONTROL ASSY SINGLE (1) (DF9.9T) » 36890-93J00
- OPT:REMOTE CONTROL ASSY SINGLE (1) (DF9.9TH) » 36890-93J00
- OPT:CONCEALED REMOCON (1) » 36890-93J00
- OPT:TOP MOUNT SINGLE (1) » 36890-93J00
- OPT:CONCEALED REMOCON (1) » 36890-93J00
- OPT:TOP MOUNT SINGLE (1) » 36890-93J00
- OPT:TOP MOUNT SINGLE (1) (210001~) » 36890-93J00
- OPT:TOP MOUNT SINGLE (1) (310001~) » 36890-93J00
- OPT:CONCEALED REMOCON (1) (210001~) » 36890-93J00
- OPT:CONCEALED REMOCON (1) (310001~) » 36890-93J00
- OPT:CONCEALED REMOCON (1) » 36890-93J00
- OPT:TOP MOUNT SINGLE (1) » 36890-93J00
- OPT:CONCEALED REMOCON (1) » 36890-93J00
- OPT:TOP MOUNT SINGLE (1) » 36890-93J00
- OPT:REMOTE CONTROL ASSY SINGLE (1) » 36890-93J00
- OPT:TOP MOUNT SINGLE (1)(MODEL:05-07) » 36890-93J00
- OPT:TOP MOUNT SINGLE (1) » 36890-93J00
- OPT:CONCEALED REMOCON (1) » 36890-93J00
- OPT:CONCEALED REMOCON (1) » 36890-93J00
- OPT:TOP MOUNT SINGLE (1) » 36890-93J00
- OPT:TOP MOUNT SINGLE (1) (210001~) » 36890-93J00
- OPT:TOP MOUNT SINGLE (1) (310001~) » 36890-93J00
- OPT:CONCEALED REMOCON (1) (210001~) » 36890-93J00
- OPT:CONCEALED REMOCON (1) (310001~) » 36890-93J00
- OPT:CONCEALED REMOCON (1) » 36890-93J00
- OPT:TOP MOUNT SINGLE (1) » 36890-93J00
- OPT:CONCEALED REMOCON (1) » 36890-93J00
- OPT:TOP MOUNT SINGLE (1) » 36890-93J00
- OPT:CONCEALED REMOCON (1) » 36890-93J00
- OPT:TOP MOUNT SINGLE (1) » 36890-93J00
- OPT:CONCEALED REMOCON (1) » 36890-93J00
- OPT:TOP MOUNT SINGLE (1) » 36890-93J00
- OPT:TOP MOUNT SINGLE (1) » 36890-93J00
- OPT:CONCEALED REMOCON (1) » 36890-93J00
- OPT:TOP MOUNT SINGLE (1) » 36890-93J00
- OPT:CONCEALED REMOCON (1) » 36890-93J00
- OPT:CONCEALED REMOCON (1) » 36890-93J00
- OPT:TOP MOUNT SINGLE (1) » 36890-93J00
- OPT:REMOTE CONTROL ASSY SINGLE (1) » 36890-93J00
- OPT:CONCEALED REMOCON (1) » 36890-93J00
- OPT:TOP MOUNT SINGLE (1) » 36890-93J00
- OPT:TOP MOUNT SINGLE (1) » 36890-93J00
- OPT:CONCEALED REMOCON (1) » 36890-93J00
- OPT:CONCEALED REMOCON (1) » 36890-93J00
- OPT:TOP MOUNT SINGLE (1) » 36890-93J00
- OPT:CONCEALED REMOCON (1) » 36890-93J00
- OPT:TOP MOUNT SINGLE (1) » 36890-93J00
- OPT:CONCEALED REMOCON (1) » 36890-93J00
- OPT:TOP MOUNT SINGLE (1) » 36890-93J00
- OPT:CONCEALED REMOCON (1) » 36890-93J00
- OPT:TOP MOUNT SINGLE (1) » 36890-93J00
- OPT:TOP MOUNT SINGLE (1) » 36890-93J00
- OPT:CONCEALED REMOCON (1) » 36890-93J00
- OPT:TOP MOUNT SINGLE (1) » 36890-93J00
- OPT:CONCEALED REMOCON (1) » 36890-93J00
- OPT:CONCEALED REMOCON (1) » 36890-93J00
- OPT:TOP MOUNT SINGLE (1) » 36890-93J00
- OPT:CONCEALED REMOCON (1) » 36890-93J00
- OPT:TOP MOUNT SINGLE (1) » 36890-93J00
- OPT:CONCEALED REMOCON (1) » 36890-93J00
- OPT:TOP MOUNT SINGLE (1) » 36890-93J00
- OPT:CONCEALED REMOCON (1) » 36890-93J00
- OPT:TOP MOUNT SINGLE (1) » 36890-93J00
- OPT:CONCEALED REMOCON (1) » 36890-93J00
- OPT:TOP MOUNT SINGLE (1) » 36890-93J00
- OPT:TOP MOUNT SINGLE (1) » 36890-93J00
- OPT:CONCEALED REMOCON (1) » 36890-93J00
- OPT:CONCEALED REMOCON (1) » 36890-93J00
- OPT:TOP MOUNT SINGLE (1) » 36890-93J00
- OPT:TOP MOUNT SINGLE (1) » 36890-93J00
- OPT:CONCEALED REMOCON (1) » 36890-93J00
- OPT:CONCEALED REMOCON (1) » 36890-93J00
- OPT:TOP MOUNT SINGLE (1) » 36890-93J00
- OPT:TOP MOUNT SINGLE (1) » 36890-93J00
- OPT:CONCEALED REMOCON (1) » 36890-93J00
- OPT:CONCEALED REMOCON (1) » 36890-93J00
- OPT:TOP MOUNT SINGLE (1) » 36890-93J00
- OPT:CONCEALED REMOCON (1) » 36890-93J00
- OPT:TOP MOUNT SINGLE (1) » 36890-93J00
- OPT:TOP MOUNT SINGLE (1) » 36890-93J00
- OPT:CONCEALED REMOCON (1) » 36890-93J00
- OPT:TOP MOUNT SINGLE (1)(MODEL:05-10) » 36890-93J00
- OPT:TOP MOUNT SINGLE (1)(MODEL:05-09) » 36890-93J00
- OPT:TOP MOUNT SINGLE (1)(MODEL:05-10) » 36890-93J00
- OPT:TOP MOUNT SINGLE (1) » 36890-93J00
- OPT:REMOTE CONTROL ASSY SINGLE(1) » 36890-93J00
- OPT:TOP MOUNT SINGLE (1)(MODEL:05-07) » 36890-93J00
- OPT:TOP MOUNT SINGLE (1)(MODEL:05-07) » 36890-93J00
- OPT:TOP MOUNT SINGLE (1)(MODEL:05-09) » 36890-93J00
- OPT:TOP MOUNT SINGLE (1)(MODEL:05-10) » 36890-93J00
- OPT:TOP MOUNT SINGLE (1)(MODEL:05-10) » 36890-93J00
- OPT:TOP MOUNT SINGLE (1) » 36890-93J00
- OPT:REMOTE CONTROL ASSY SINGLE(1) » 36890-93J00
- OPT:TOP MOUNT SINGLE (1)(MODEL:05-07) » 36890-93J00
- OPT:TOP MOUNT SINGLE (1)(MODEL:05-07) » 36890-93J00
- OPT:TOP MOUNT SINGLE (1)(MODEL:05-09) » 36890-93J00
- OPT:TOP MOUNT SINGLE (1) » 36890-93J00
Information:
Illustration 1 g00751534
Schematic
Breathing ether vapors or repeated contact of ether with skin can cause personal injury. Personal injury may occur from failure to adhere to the following procedures.Use ether only in well ventilated areas.Do not smoke while changing ether cylinders.Use ether with care to avoid fires.Do not store replacement ether cylinders in living areas or in the operator's compartment.Do not store ether cylinders in direct sunlight or at temperatures above 49 °C (120 °F).Discard cylinders in a safe place. Do not puncture or burn cylinders.Keep ether cylinders out of the reach of unauthorized personnel.To avoid possible injury, be sure the brakes are applied and all controls are in Hold or Neutral when starting the engine.
Test Step 1. Inspect Electrical Connectors and Wiring
Turn the keyswitch to the OFF/RESET position.
Thoroughly inspect ECM connector J1/P1, machine connector J3/P3, and all other connectors in the wiring harness. Refer to Troubleshooting, "Electrical Connectors - Inspect" for details.
Inspect the following components for damage, corrosion, and incorrect attachment:
Battery posts
Alternator
Breaker
Engine ground
Chassis groundExpected Result:All connectors, pins, and sockets should be completely inserted and coupled. The harness and wiring should be free of corrosion, abrasion, and pinch points. All connections and grounds should be tight and free of corrosion.Results:
OK - Proceed to Test Step 2.
Not OK - Repair: Repair the circuit.Verify that the repair eliminates the problem. Stop.Test Step 2. Check the Starting Aid Switch Status on ET
Remove the ether canister from the ether solenoid.
Connect ET to the service tool connector.
Turn the keyswitch to the ON position.
Press the starting aid switch to "MANUAL". Observe the "Starting Aid Switch Status" on ET.Expected Result:When the starting aid switch is pressed, ET should display the status of the starting aid switch as ON.When the starting aid switch is not pressed, ET should display the status of the starting aid switch as OFF.Results:
OK - The starting aid switch is operating correctly. Proceed to Test Step 6.
Not OK - The ECM is not properly reading the signal from the starting aid switch. Proceed to Test Step 3.Test Step 3. Check the Resistance of the Relay
Illustration 2 g00743796
Connector for the ether relay
Turn the keyswitch to the OFF/RESET position.
Disconnect the wires at terminal 85 (Ether ON) and terminal 86 (Solenoid Return) at the ether relay.
Measure the resistance across terminal 85 (Ether ON) and terminal 86 (Solenoid Return).
Reconnect the wires to the ether relay.Expected Result:The resistance should be between 250 Ohms and 500 Ohms.Results:
OK - Proceed to Test Step 4.
Not OK - The relay is faulty.Repair: Replace the relay.Verify that the repair eliminates the problem. Stop.Test Step 4. Short the Switch Wires
Remove wire F720-GN (Starting Aid Switch) and wire 998-BR (Digital Return) from the starting aid switch.
Short wire F720-GN (Starting Aid Switch) to wire 998-BR (Digital Return).Expected Result:When the wires are shorted, ET should display the status of the starting aid switch as ON.When the wires are not shorted, ET should display the status of the starting aid switch as OFF.Results:
OK - The starting aid switch is not operating correctly.Repair: Replace the starting aid switch.Verify that the repair eliminates the problem. Stop.
Not OK - The starting aid switch is operating correctly. Proceed to Test Step 5.Test Step 5. Short the Switch Inputs at the ECM
Illustration 3 g00743804
J1/P1 breakout
Turn the keyswitch to the OFF position and install a 7X-1715 Adapter Cable (40 Pin Breakout) at ECM connector J1/P1.
Turn the keyswitch to the ON position.
Use a suitable piece of wire to short P1:25 (Starting Aid Switch) and P1:29 (Digital Return) at the breakout.
Observe the results on the "Status" screen of ET.Expected Result:When the wires are shorted, ET should display the status of the starting aid switch as ON.When the wires are not shorted, ET should display the status of the starting aid switch as OFF.Results:
OK - There is a problem in the wiring between the switch and the ECM.Repair: Repair the circuit.Verify that the repair eliminates the problem. Stop.
Not OK - The ECM is not reading the switch input properly.Repair: Verify your results. Replace the ECM. Refer to Troubleshooting, "Replacing the ECM" before replacing the ECM.Verify that the repair eliminates the problem. Stop.Test Step 6. Check the Resistance of the Ether Solenoid
Disconnect ether solenoid connector J37/P37.
Measure the resistance between J37:1 (Solenoid Power) and J37:2 (Solenoid Return).Expected Result:Resistance should be less than 10 Ohms.
Parts wire Suzuki:
36894-95201
36894-95201 WIRE LEAD
DF100, DF100, DF100, DF100A, DF115, DF115, DF115, DF115A, DF115TL, DF140, DF140, DF140, DF140A, DF140T, DF140T, DF140Z, DF140Z, DF140Z, DF140Z, DF15, DF15, DF15, DF15S, DF25, DF25Q, DF25Q(QR), DF25T, DF30, DF30Q, DF30Q(QR), DF30T, DF40, DF40, DF40A,
36894-94401
36894-94401 WIRE LEAD
DF25, DF25Q, DF25Q(QR), DF25T, DF30, DF30Q, DF30Q(QR), DF30T, DF40, DF40, DF40QH, DF40TL, DF50, DF50, DF50QH, DF50TL, DT115, DT140, DT15C, DT40C, DT55CLF, DT55CRLG, DT55CRLJ, DT55CRLK, DT55CRLL, DT55CRSG, DT55CRSH, DT55HTCLH, DT55HTCLJ, DT55HTCLK, DT
36620-93J10

36620-93J10 WIRE ASSY, REMOCON EXTENSION
DF100, DF100, DF100, DF100A, DF115, DF115, DF115, DF115A, DF115TL, DF140, DF140, DF140, DF140A, DF140T, DF140T, DF140Z, DF140Z, DF140Z, DF140Z, DF150, DF150, DF150, DF150TX, DF150ZX, DF175, DF175, DF175, DF175TX, DF175ZX, DF200, DF200, DF200, DF200T,
36620-93J30

36620-93J30 WIRE ASSY, REMOCON ADAPTER NO.2
DF100, DF100, DF100, DF100A, DF115, DF115, DF115, DF115A, DF115TL, DF140, DF140, DF140, DF140A, DF140T, DF140T, DF140Z, DF140Z, DF140Z, DF140Z, DF150, DF150, DF150, DF150TX, DF150ZX, DF175, DF175, DF175, DF175TX, DF175ZX, DF200, DF200, DF200, DF200T,
36620-93J20

36620-93J20 WIRE ASSY, REMOCON ADAPTER NO.1
DF100, DF100, DF115, DF115, DF115TL, DF140, DF140, DF140T, DF140T, DF140Z, DF140Z, DF140Z, DF140Z, DF40, DF40, DF40QH, DF40TL, DF50, DF50, DF50QH, DF50TL, DF60, DF60HL, DF60TL, DF70, DF70THL, DF70TL, DF90, DF90TL
36620-94J01

36620-94J01 WIRE ASSY, REMOTE CONTROL
DF15, DF15, DF15, DF15A, DF20A, DF25R, DF25R, DF8A, DF8AR, DF9.9, DF9.9A, DF9.9AR, DF9.9R, DF9.9TH, DF9.9TH, DF99AR, DF99R, DF99TH
36620-93J02

36620-93J02 WIRE ASSY, REMOTE CONTROL
DF100, DF100A, DF115, DF115A, DF140A, DF15, DF150, DF175, DF200, DF225, DF250, DF40A, DF50A, DF60A, DF70A, DF80A, DF9.9, DF90A
36620-93J52

36620-93J52 WIRE ASSY, REMOTE CONTROL
DF100, DF100A, DF115, DF115A, DF140A, DF150, DF175, DF200, DF225, DF250, DF40A, DF50A, DF60A, DF70A, DF80A, DF90A